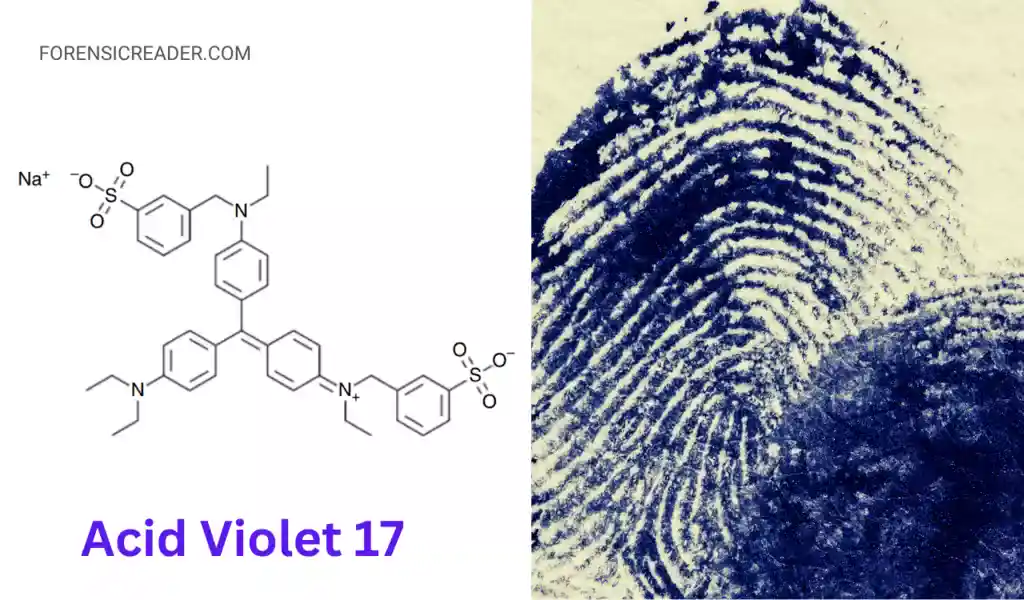
Acid Violet 17 is a triarylmethane dye that stains protein in blood to give a dark purple color and produces some fluorescence in the red and near-infrared region. It is one of the most recommended blood fingerprint enhancement methods on porous surfaces.
Developed by: First proposed in 2001 by Sear and coworkers at Home Office Scientific Development Branch (HOSDB) as an alternative to Acid Black 1.
Categories: Protein Stain dyes. Other dyes are Acid Black 1, Acid Yellow7, Coomassie Blue, and Crowle’s Double Stain.
Table of Acid Violet 17
| Reagent | Acid Violet 17 |
| Color Index Number | CI 42650 |
| Other Names | AV17, Coomassie brilliant violet R150 |
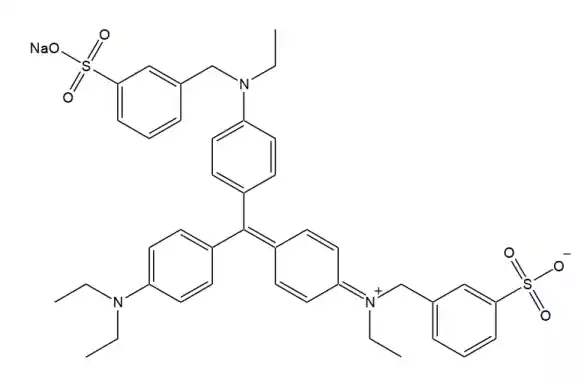
| Molecular Formula | C41H44N3NaO6S2 |
| Proposed by | Sears et al., 2001 |
| Developed Prints Color | Dark Purple |
| Fluorescence | Weak fluorescence in red and near-infrared regions |
| Examined Using | Yellow filter |
| React With | Proteins in plasma, heme groups, and agglutinogens |
| Contrasting Means | Ridges are stained more as compared to the background |
| Type of Surfaces | Porous and non-porous |
| Dyeing Time | At least 3 minutes |
| Destaining Time | At least 5 minutes (extended in heavy deposits) |
| Surface Color | Light colored surface gives better contrast |
| Blood Deposit | Light to medium deposits |
| False Positive Indication of blood | Proteinaceous materials |
| Alternative of | Water-based Amido black and Crowle’s Double Stain |
| Substitute with | Methanol-based Amido Black (non-porous) |
Principle
Acid Violet 17 enhances the fingermarks (or other marks) by reacting with blood plasma, heme, and agglutinogens to develop a dark purple color which can be visible without any alternative light source.
AV17, like other acid dyes, produces fluorescence when excited in the deep red or NIR region, but the intensity is low. However, even at lower fluorescence, ridge details are not that compromised, and can be used to produce more contrasting ridge details on multi-colored surfaces.
Note: AV17 can be absorbed by some porous surfaces, so make sure to check the background staining on non-target enhancement areas.
Sequences of Using Acid Violet 17
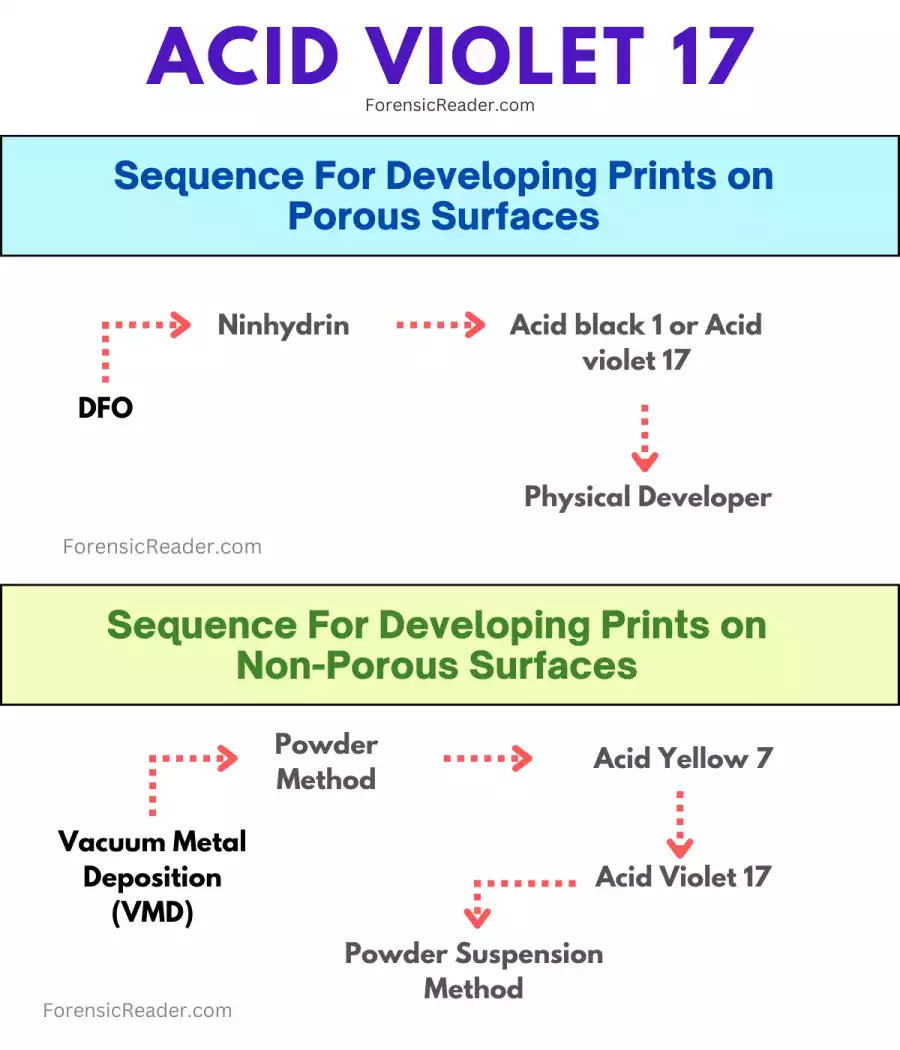
Following is the effective sequence of using Acid Violet 17 for forensic cases:
A. On Porous Surfaces: DFO-> Ninhydrin-> Acid black 1 or Acid violet 17-> Physical developer.
B. On Non-Porous Surfaces: Vacuum metal deposition (VMD)-> Powders-> Acid Yellow 7-> Acid Violet 17-> Powder suspension or solvent black 3.
Note: Perform a spot test in a non-target enhancement area before deciding between two similar reagents (for example, Amido black or Acid violet 17).
Preparation of Fixing, Staining, and Destaining Solution
Following is the described outline used by Forensic lab authorities and also proposed in Home Office Fingermark Visualisation Manual.
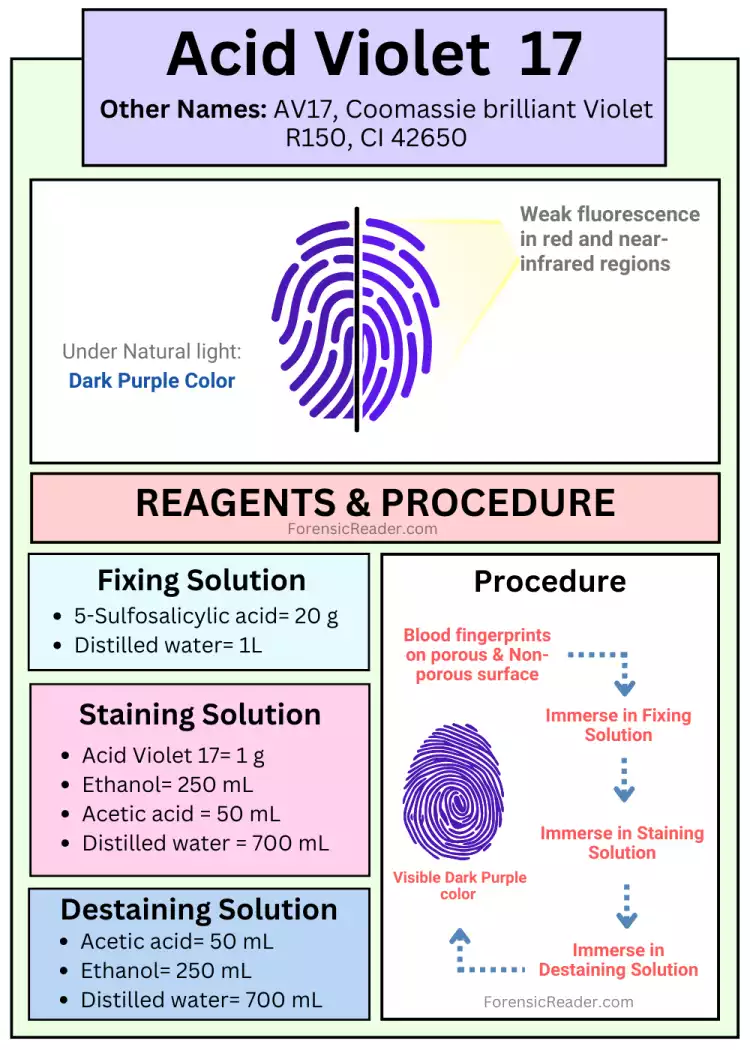
A: Fixing Solution
If the blood is relatively fresh, fixing it will change its color from dark red to dark brown.
Reagent Required:
- 5-Sulfosalicylic acid= 20 g
- Distilled water= 1000 mL
Preparation of Fixing Solution
- 20 g 5-Sulfosalicylic acid dissolved in 1000 mL of distilled water.
- Mix with a magnetic stirrer until all 5-Sulfosalicylic acid dissolved completely.
- Store the solution in a dark glass bottle.
B: Staining Acid Violet 17 Solution
The Stain solution is a mixture of acid violet 17, ethanol, acetic acid, and distilled water.
- Use of Ethanol in Acid Violet 17: prevents blood diffusion during the dyeing stage and lower toxicity and flammability than methanol.
- Use of Acetic Acid: provides acid condition helping protein molecules to acquire a positive charge to attract acid dye anions.
- Use of Distilled Water: increased flash point of around 30°C provides better workability at room temperature.
Reagent Required:
- Acid Violet 17= 1 g
- Ethanol= 250 mL
- Acetic acid = 50 mL
- Distilled water = 700 mL
Preparation of Acid Violet 17 Working Solution
- Dissolve 1 g acid violet dye in 700 mL distilled water.
- Mix with a magnetic stirrer until AC17 gets fully dissolved.
- Add 50 mL acetic acid and 250 mL ethanol and stir it well.
- Store the dyeing solution in a dark glass bottle.
C: Destaining Solution
Staining and destaining solutions use the same reagent except the Acid Violet 17. Purpose: to re-dissolve any remaining dye molecules not bound to the proteins
Reagent Required:
- Acetic acid= 50 mL
- Ethanol= 250 mL
- Distilled water= 700 mL
Preparation of Destaining Solution
- Add 50 mL of acetic acid in 700 mL water followed by the addition of 250 mL ethanol.
- Mix the solution using a magnetic stirrer.
- Store the solution in a glass bottle.
Note: Fume hood should be used when preparing and applying Acid Violet 17.
Procedure for Enhancing Fingerprints, Footprints, and Shoeprints Using Acid Violet 17
There are two methods of enhancing fingerprints: (1) Immersion method (2) Absorbent method
Method 1: Immersion Method
If the size of the evidence permits immersion, it should always be preferred over the absorbent method.
Part A: Fixing the Blood Residue
- In a container or tray, pour 500 mL of fixing solution.
- Immerse the blood fingerprint evidence mark surface inside the fixing tray for at least 5 minutes. In case of heavy blood deposits, fixing timing can be extended to a few more minutes.
Note: If the evidence is large enough to be immersed in solution but on a flat surface like a floor, make a well around the blood fingerprints or shoe marks.
- If more fixing solutions are required to immerse the evidentiary material, pour through the walls.
Note: If the evidence marks are on surfaces that can’t be immersed or on horizontal surfaces, absorbent paper method should be employed.
Part B: Staining Procedure
- Remove the material from the fixing solution, and immerse it in the Acid Violet 17 staining solution for at least 3 minutes.
- Slightly agitate the solution to improve staining performance.
Part C: Destaining Procedure
- Remove the immersed fingerprints from the staining solution, and immerse it in the destaining solution.
- Slightly agitate for about 1 minute to lessen background staining.
Note: If heavy blood deposits, stay in the destaining solution until the ridge details become clearer.
- Dry the developed fingermarks in a fume hood.
- Photograph the dried fingerprints or footprints before lifting.
Note: Lifting can be done, but only preferred over non-porous surfaces. White gel lifters and tapes are great for lifting developed fingermarks.
Method 2: Using Absorbent Paper
Part A: Fixing the Blood Residue
- Cut three pieces of filter paper large enough to cover the entire blood fingermarks area.
- Wet s filter paper with the prepared fixing solution.
- From one side of filter paper, anchored down over the fingermarks.
- Let the filter paper rest over the surface for at least 3 minutes (if heavy deposit: 5 minutes).
- If the filter paper feels dry, pour the fixing solution using a wash bottle or pipette to the edges of the filter paper.
- No need to remove the excess fixing solution.
Part B: Staining Procedure
- Take a filter paper and wet it with Acid Violet 17 dyeing solution.
- Apply over the surface from one side to the other and let it rest for 3 minutes.
- Using a wash bottle or pipette, pour the staining solution into the edges of the filter paper.
- Remove the filter paper after 3 minutes.
Part C: Destaining Procedure
- Using a pipette or wash bottle, pour the destaining solution from the sides and let it flow over the fingermarks.
- After each minute, wash the solution by pouring more destaining solution from the sides.
- Repeat the process until the ridge details become crispy.
- Remove extra destaining solution using absorbing paper or filter paper.
- Let the surface air dry or use a low-speed hair dryer in circulation movement.
- Photographs of the purple-developed fingerprints:
- Without a filter in visible light: purple developed marks
- With yellow filters under the red or near-infrared region: purple fluorescence
Note: Ethanol‐containing staining or de‐staining solutions should never be sprayed in environments without adequate extraction or ventilation because this lowers the flash point by at least 100°C, making it impossible to work without creating a flammable atmosphere
Observation and Result
A. Under Natural White light: Visible dark purple marks.
B. Under Alternative Light Source: Some purple fluorescence when excited in red and near-infrared regions.
C. Heavy Deposit of Blood marks: Longer destaining can result in remarkable details.
Advantages of using Acid Violet 17
- Visible dark ridge details that do not require additional lighting.
- Best contrasts on a lighter surface.
- Lighter background staining (compared to Acid Yellow 7) makes it suitable for both porous and non-porous surfaces.
- Developed prints can be lifted more than once without diminishing ridge details.
- Acid Violet 17 is cheaper than Acid Yellow 7.
Disadvantages
- Not suitable for dark-colored surfaces.
- Fluorescence is low than Acid Yellow 7 and not suitable for shiny surfaces.
Precautions
- AV17 should not be used as a blood detection test. Separate presumptive and confirmatory tests should be done.
- Avoid spraying solutions in indoor conditions because solution containing ethanol creates a flammable environment.
- Always wear protective coats and gloves while performing examinations.
- Use protection and filter glasses when observing fingerprints in high-intensity alternative light sources.
- Store the prepared reagent in a dark-colored bottle and label them appropriately.
General FAQs
1. Is it possible to get DNA after treatment with Acid Yellow 7?
Yes, DNA can be extracted after staining with Acid Violet 17. As per The Home Office data, DNA can even be extracted after fluorescence examination. However, using multiple fingerprint development techniques might hinder the ability to get DNA.
2. Why is it advisable to use a fume cupboard while developing prints with blood using protein dyes?
Protein dyes such as Acid Violet 17, Acid Yellow 7, and Acid Black 1 use a highly flammable reagent called ethanol. So, while preparing and using it overprints, the ratio of ethanol in air increases, which creates a flammable mixture with ambient temperatures above 28 °C.
3. Temperature to which blood fingerprints can be developed using Acid Violet 17?
According to a study (Moore, et.al. 2008), protein stains dye of amido black, acid yellow 17, and acid violet 17 can enhance blood prints exposed to a temperature around 200°C. However, the quality of ridge details is not great and usually results in partial fingerprints.
4. What is the effective concentration of using Acid Violet 17 dyes?
According to the study of Sears and Prizeman, 2000, the protein-dye concentration of Acid Violet 17 should be around 0.1w/v. Less than <0.1w/v gives less effective staining. Also applicable to other acid dyes such as acid yellow 7, amido black, etc.
5. Which Light source is used with Acid Violet 17?
High-intensity light sources capable of emitting shorter wavelengths between 350 and 450 nm, excite the background fluorescence of AV17 treatment.
References:
- Enhancement of fingerprints in blood–part 2: Protein dyes.” Journal of Forensic Identification, by Sears, et.al. [Link]
- Home Office Fingerprint Source Book [Link]
- Recovery of fingerprints from arson scenes: Part 2-Fingerprints in blood.” Moore, Jennifer. Journal of Forensic Identification. [Link]
- Enhancement techniques for fingerprints in blood by Sears, Vaughn G. [Link]
- Fingerprints and Other Ridge Skin Impressions [Researchgate]
- The Fingerprint Sourcebook [book]
- Friction Ridge Skin: Comparision and Identification of Fingerprints [Google books]

FR Author Group at ForensicReader is a team of Forensic experts and scholars having B.Sc, M.Sc, or Doctorate( Ph.D.) degrees in Forensic Science. We published on topics on fingerprints, questioned documents, forensic medicine, toxicology, physical evidence, and related case studies. Know More.