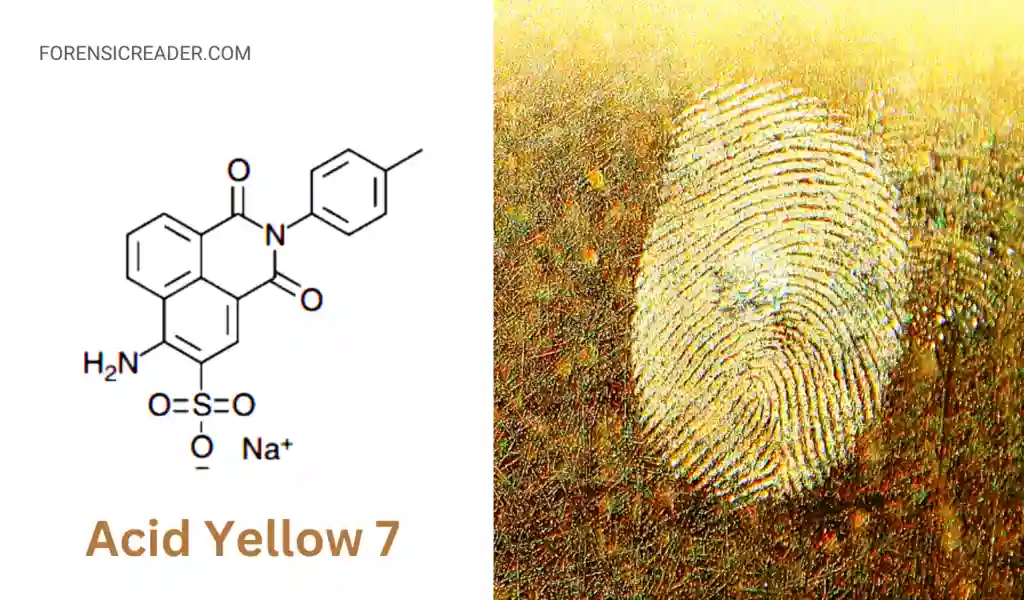
Acid Yellow 7 is an amino ketone dye that stains protein in blood to give a pale yellow color and produces a bright yellow fluorescence when illuminated with blue light (385 to 509 nm). It is the most widely used method for the enhancement of blood fingerprints on non-porous dark-colored surfaces.
Developed by: The development using Acid Yellow 7 was first proposed in 2005 by Sears et al. as a fluorescent protein stain.
Table of Acid Yellow 7 Blood Enhancement Reagent
| Reagent | Acid Yellow 7 |
| Reagent Category* | Acid Dyes |
| Developed by | Sears et al., 2005 |
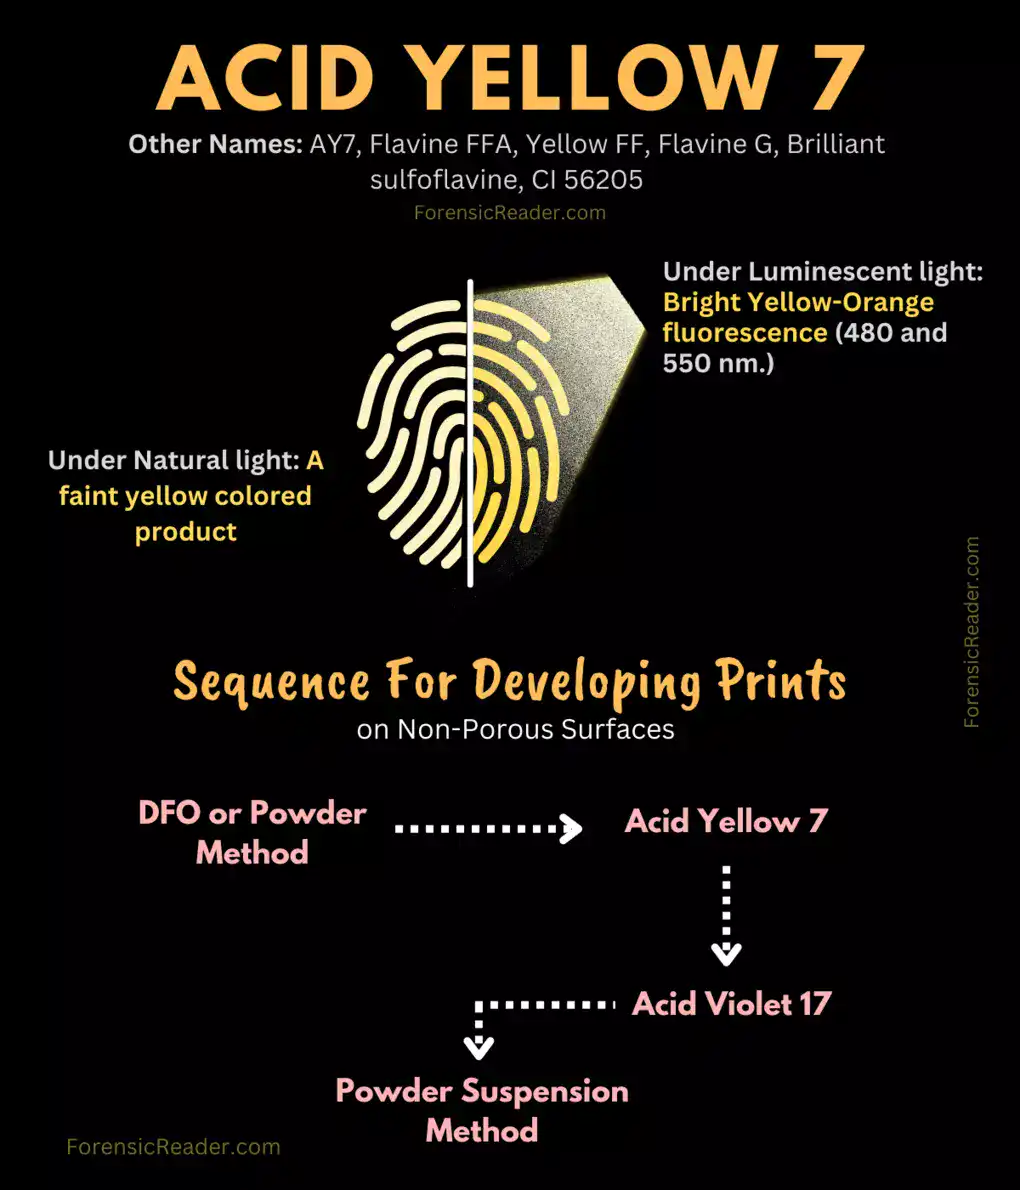
| Other Names | AY7, Flavine FFA, Yellow FF, Flavine G, Brilliant sulfoflavine, CI 56205 |
| React With | Proteins in plasma, haem groups, and agglutinogens |
| Developed Prints Color | Pale Yellow |
| Fluorescence Light (400 to 485 nm) | Bright Yellow-Orange fluorescence emitted between 480 and 550 nm. |
| Observed Using | Orange barrier filter or orange safety glasses |
| Type of Surface | Non-porous (preferred) |
| Surface Color | Dark colored surface |
| Blood deposit | Light to medium deposits |
| False Positive | Proteinaceous materials (egg white, whey protein, and semen) |
| Alternative of | Non-fluorescent Amido black on porous surfaces |
Principle and Working Reaction of Acid Yellow 7
When Acid yellow 7 stained the blood-contaminated surface, it reacts with the heme group. Heme absorbs both the wavelength of excitation wavelength and reabsorbs those emitted as fluorescence.
The higher the heme concentration higher is the quenching effect (lowers the fluorescence intensity). Hence, at a higher deposit of blood more quenching effect is making it less pronounced for better enhancements. So, the de-staining process should be extended to remove excess blood marks.
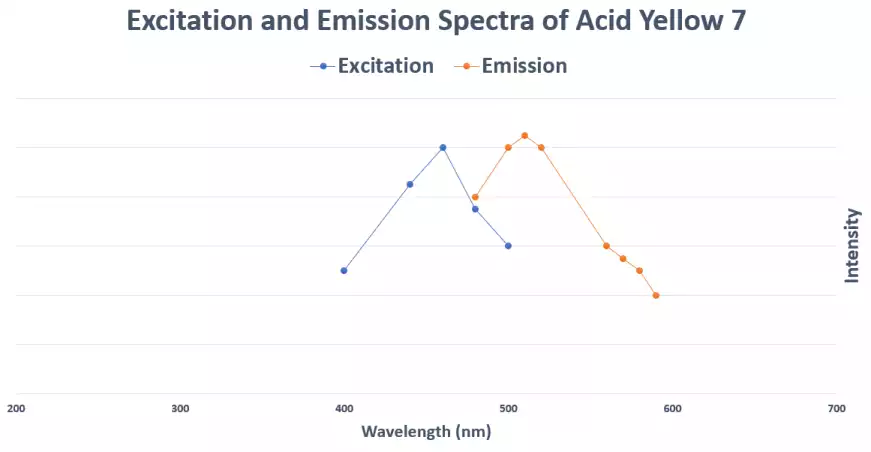
The resultant enhanced marks are pale yellow and give a better visualization of fluorescence under high-intensity light. Following are the excitation and emission spectra for the Acid Yellow 7 sample:
Surface to Choose: AY7 is recommended only for use on dark non-porous surfaces.
- Porous Surfaces with AY7: It should be avoided at any cost if dealing with mico ridge detailing such as fingerprints and footprints.
- Porous Surfaces with AY7: Ridges from footwear can be developed on porous surfaces. One researcher developed shoe prints on cotton fabric using AY7.
Note 1: Acid yellow 7 can develop very good details even prints older than 2 weeks.
Preparation of Fixing, Working, and De-Staining Solution for Acid Yellow 7
There are three sets of solutions used for developing ridge marks over porous surfaces.
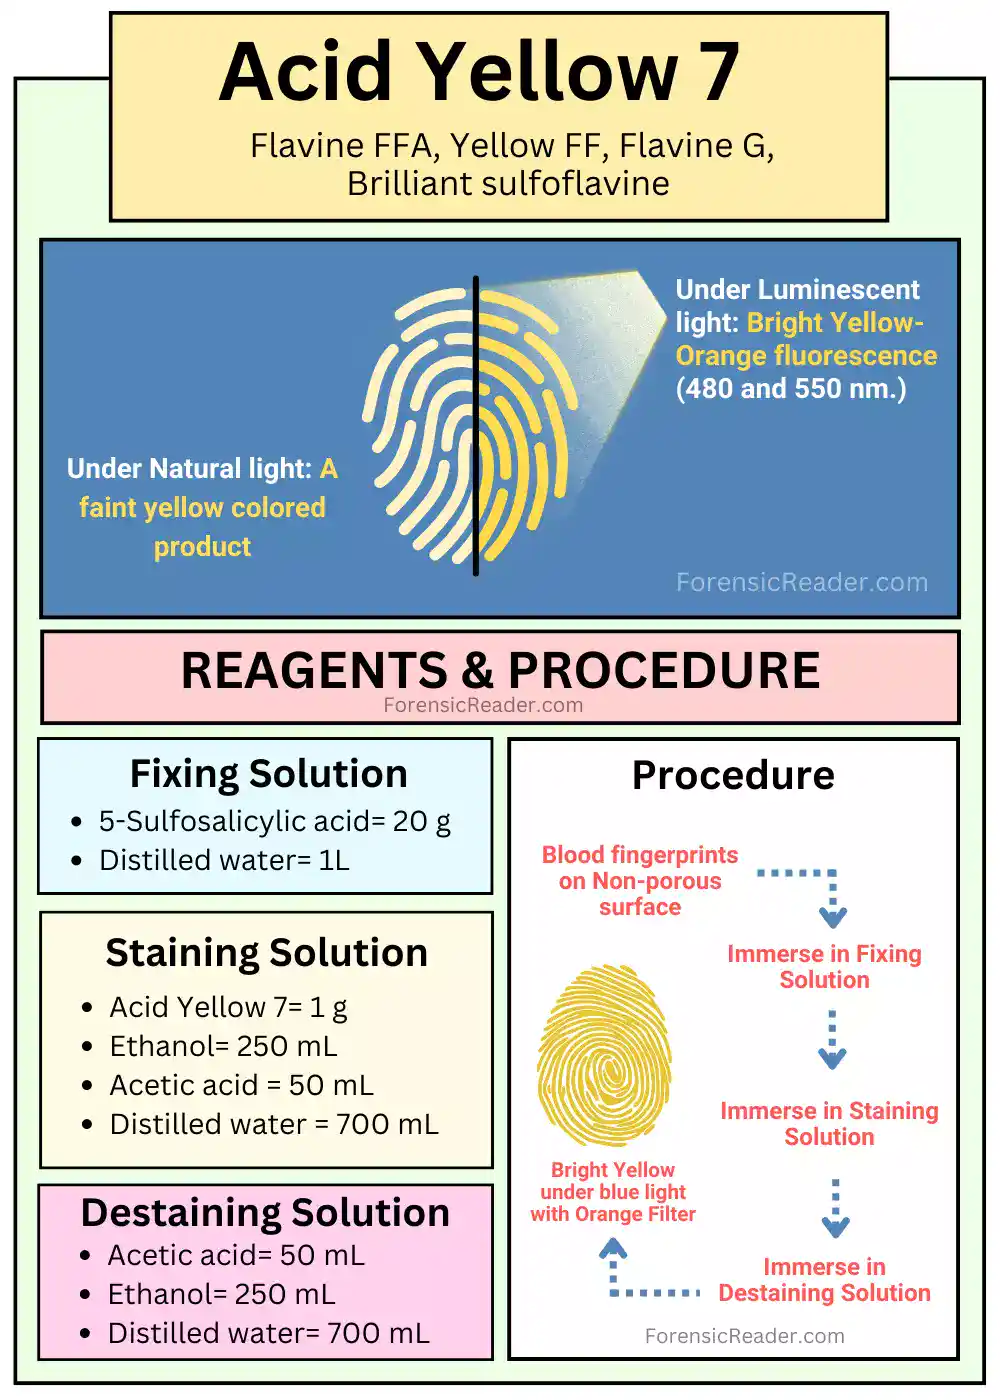
Fixing Solution (Beaker A)
Importance of Fixing Solution in Acid Yellow 7: Without fixing the solution, the blood marks will diffuse when the staining solution is directly applied to the blood marks.
Reagent Required:
- 5-Sulfosalicylic acid= 20 g
- Distilled water= 1L
Preparation of Fixing Solution
- 20 g 5-Sulfosalicylic acid dissolved in 1L of distilled water.
- Stir the solution until all 5-sulfosalicylic acid gets dissolved.
- Store the solution in a glass or plastic bottle.
Dye/Staining Working Solution (Beaker B)
Reagent Required:
- Acid Yellow 7= 1 g
- Ethanol= 250 mL
- Acetic acid = 50 mL
- Distilled water = 700 mL
Note 2: Buy Acid Yellow 7 from BVDA
Preparation of Acid Yellow 7 Working Solution
- Dissolve 1 g Acid Yellow dye in 700 mL distilled water, 250 mL ethanol, and 50 mL acetic acid
- Stir, until it becomes a complete solution.
- Store the working solution in a glass or plastic bottle.
Quick Notes
Q1. Acid Yellow 7 Vs Acid Yellow 19? Which is better?
Acid Yellow 19 is another protein stain dye that produces visible violet strain and orange fluorescences on porous/non-porous dark and light surfaces. Unlike acid yellow 7 which produces faint yellow color that restricts its use to dark non-porous surfaces.
Q2. Why is Acid Yellow 7 not used on a Porous surface while other acid dyes can be used?
Acid yellow 7 is not recommended for blood-contaminated porous surfaces because it is very difficult to remove the strain from the background, making it more difficult to detect fingermarks. However, other acid dyes such as Acid Black 1 and Acid Violet 17 are relatively easy to wash out from the background producing much better ridge details.
Q3. Why does Heavy deposit interfere with Acid Yellow 7 Staining?
The resultant fluorescence from the stained mark can be less pronounced on heavy deposits of blood as the heme group retains its ability to absorb both the wavelengths of the excitation light and those that are emitted as fluorescence.
Q4. Which Light source is used with Acid Yellow 7?
High-intensity light sources capable of emitting wavelengths between 420 and 485 nm must be used to excite fluorescence from blood dyed with acid yellow 7. The fluorescence emitted is between 480 and 550 nm.
Q5. How to Store Acid Yellow 7 Solution?
Store the solution at room temperature in an appropriately labeled clear or dark bottle. The shelf life is about 12 months.
Q6. Why fixing and dying solution of Acid yellow 7 shouldn’t be mixed?
All-in-one formulations that stain and fix are generally not stable for more than a day or two and are not as effective as a two-stage process, both in fixing and dyeing separately.
Q7. What is the sequence of developing blood fingerprints while using Acid Yellow 7?
For blood-contaminated marks on non-porous surfaces, the most effective sequence should be Vacuum metal deposition (VMD), Powders, Acid yellow 7, Acid Violet 17, and lastly either powder suspension or solvent black 3.
Destaining/Washing Solution (Beaker C)
Reagent Required:
- Acetic acid= 50 mL
- Ethanol= 250 mL
- Distilled water= 700 mL
Preparation of Destaining Solution
- Pour 50 mL of acetic acid into 700 mL water followed by the addition of 250 mL ethanol.
- Mix all the solutions well.
- Store the solution in a glass or plastic bottle for future use.
Procedure for Developing Fingerprints, Footprints, and Shoeprints Using Acid Yellow 7
- In a tray, pour the fixing solution from beaker A.
- Immerse the evidentiary item in the fixing solution tray for at least 5 minutes.
Note 3: If the size of evidence can’t be submerged in a container/tray, the best way is to use absorbent paper such as filter paper or paper towels. Place a piece of absorbent paper dipped in the respective solution over the area. If the absorbent paper becomes wet, pour the fixing solution onto the edges of the absorbent paper.
- Pour the working solution (beaker B) into another tray.
- Remove the evidentiary item from the fixing solution and immerse it in the dyeing solution for 3 to 5 minutes.
- Slightly agitate the solution to improve staining performance.
Note 5: In case of a heavy deposit, the extended dyeing time usually several hours should be employed to minimize the quenching effect of hemoglobin.
- After removing the item from the dyeing solution, immerse it in the de-staining solution.
- Slightly agitate for about 1 minute to lessen background staining.
- If necessary, the item can be reprocessed to improve its enhancement.
- Dry the evidentiary item in a fume hood.
- Observe the fingerprints or other marks using an orange barrier filter or safety glasses under a high-intensity light source (420-485 nm).
- Photograph the evidence with a preferred orange barrier filter and scale.
Note 6: Enhanced fingerprints can be lifted using thick lifting tape or a gel-based lifter. Check the article on how to lift fingerprints carefully.
Observation and Result
A. Under Natural White light: No significant difference in marks in blood. However, with extended dyeing time, it starts giving a faint yellow-colored product.
B. Under Alternative Light Source (ALS): With the application of blue light (430–450 nm) and observe using orange goggles or a long-pass orange barrier filter. Bright Yellow-Orange fluorescence can be seen emitted between 480 and 550 nm
C. Heavy Deposit of Blood marks: Fluorescence may be weak due to the quenching effect of hemoglobin.
Advantages of using Acid Yellow 7
- The most widely used dye for non-porous surfaces.
- Fluorescent yellow provides better enhancement and ridge detailing over dark surfaces.
- Best works on non-porous surfaces.
Disadvantages
- Not recommended for porous surfaces.
- Quenching is seen in heavier blood deposits that significantly diminish the fluorescence effect.
Precautions
- Make sure you consider the entire scope of blood evidence such as blood pattern, and DNA recovery before applying acid dyes.
- Protein dyes should not be used to determine whether the mark is blood or not. You should do other confirmatory tests for blood because protein dyes give false positive reactions in a number of cases.
- Presumptive test should be used for the presence of blood preferably using areas that doesn’t have ridge details.
- Avoid using solution near any ignition source because staining and de-staining contain ethanol which makes the solution flammable.
- Fluorescence examination of the surface should always be carried out before re-applying the dying solution.
- High-intensity light sources with outputs between 350 and 450 nm are the most effective.
- Always use eye protection and filter glasses when working with high-intensity light sources.
- All prepared reagents are to be labeled and stored appropriately.
General FAQs
References:
- Fingerprints and Other Ridge Skin Impressions [Researchgate]
- Home Office Fingerprint Source Book [Link]
- Enhancement of Fingerprints in Blood, Part III: Reactive Techniques, Acid Yellow 7, and Process Sequences [Researchgate]
- The Fingerprint Sourcebook [book]
- Friction Ridge Skin: Comparision and Identification of Fingerprints [Google books]
- Fingerprint Development Techniques: Theory and Application [Wiley]
- Fingerprint Analysis Laboratory Workbook [Book]
Read More:
- Fingerprint Brushes: Types And How to Choose One? A Forensic Guide
- Magnetic Powders: Types, Principle, Fingerprint Development, Advantages and Disadvantages
- How to Fill and Extract Data From Fingerprint Card? Forensic Fingerprinting
- Development of Bloody Fingerprint: Chemical Test and Techniques

FR Author Group at ForensicReader is a team of Forensic experts and scholars having B.Sc, M.Sc, or Doctorate( Ph.D.) degrees in Forensic Science. We published on topics on fingerprints, questioned documents, forensic medicine, toxicology, physical evidence, and related case studies. Know More.