Amido Black, also known as Acid Black 1, is an acid diazo dye used by forensic fingerprint experts to detect and enhance latent blood marks. Amido Black stains proteins forming a dark blue-black colored product.
It is the most widely used protein stain dye for the development of bloody fingerprints on both nonporous and porous surfaces.
| Reagent | Amido Black |
| Other Names | Acid Black 1, Naphthol Blue Black, Naphthalene Black, Amido Black 10B, Eriosin Blue Black B |
| Color Index Number | CI 20470 |
| Molecular Formula | C22H14N6Na2O9S2 |
| Developed Prints Color | Dark Blue Black |
| React With | Proteins in blood, particularly with amino groups |
| Contrasting Means | Staining blood residues, resulting in dark ridge details |
| Type of Surfaces | Porous and non-porous |
| Dyeing Time | Approximately 1 to 2 minutes |
| Destaining Time | About 5 minutes (extended in heavy deposits) |
| Surface Color | Works well on light-colored surfaces |
| Blood deposit | Suitable for light to medium deposits |
| False Positive Indication of Blood | Proteinaceous materials (egg white, whey protein, etc) |
History and Development of Amido Black (Acid Black 1)
- 1957: Oden highlights Amido Black as a protein indicator in a patent application.
- 1961: Godsell discusses the use of Amido Black by the Metropolitan Police Laboratory in a solvent base of methanol and acetic acid at a forensic science symposium.
- 1962: Puchtler et al. report the use of Amido Black to stain proteins, marking its first use for this purpose.
- 1963: Godsell introduces Amido Black (Acid Black 1) for operational use in forensic investigations.
- Early 1970s: Amido Black’s use as a latent blood enhancement method in a methanol-acetic acid mixed solvent is first reported.
- 1981: The fixing method changes from heat to immersion in methanol.
- 1989: Hussain et al. introduce a water-based version of Amido Black, broadening its applications.
The Home Office Manual of Fingerprint Detection Techniques went through several updates regarding acid black 1:
- The original manual recommends a methanol-based formulation for Amido Black.
- In a subsequent update, a water-based formulation is added to the Home Office Manual.
- Late 1990s: The Home Office Police Scientific Development Branch, led by Godsell, engages in a comprehensive effort to review and optimize Amido Black as a blood reagent.
- 2004: A new formulation by Sears and Prizeman is adopted by the UK Home Office for enhancing fingermarks in blood.
Principle of Development of Fingerprint Using Amido Black
Amido Black works by staining proteins, mainly hemoglobin and methemoglobin, present in the blood.
The principle of its working is based on:
- Creating acidic conditions, which cause blood protein molecules to acquire a positive charge (cationic).
- This positive charge subsequently attracts the negatively charged Acid Black 1 dye anions.
- The interaction results in the formation of a dark blue-colored product.
How Does Amido Black Works? (Chemistry of Development)
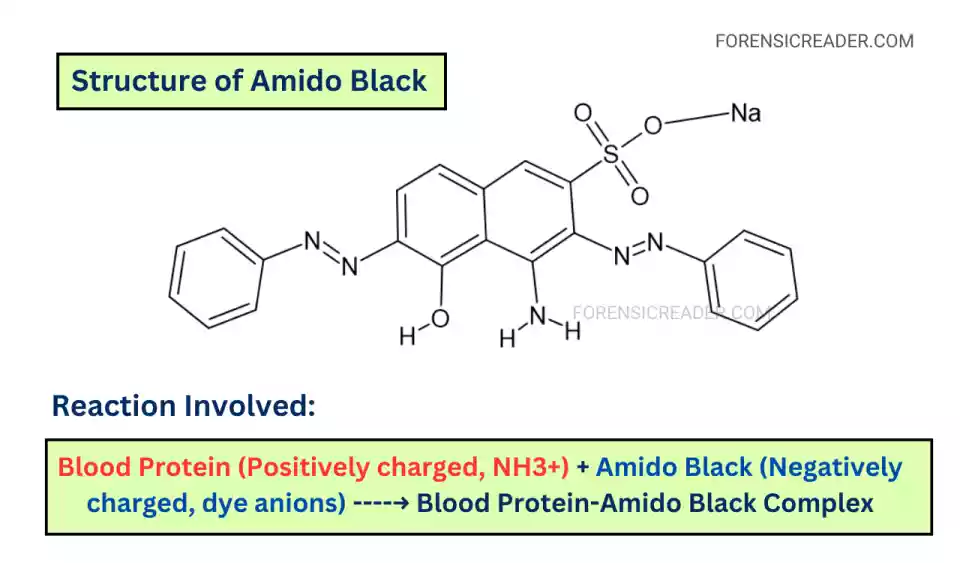
Acid Black 1 is characterized by one or more sulphonate (−SO3−) groups. These groups provide solubility in water or alcohol and a negative charge, making them anionic.
Acidic conditions in the staining solution (usually provided by acetic acid) make protein molecules in the blood positively charged (cationic), attracting acid-dye anions.
Hydrogen bonding and other physical forces like van der Waals bonds also contribute to the affinity of acid black dyes to protein molecules.
Basic chemical Reaction Involved:
Blood Protein (Positively charged, NH3+) + Amido Black (Negatively charged, dye anions) → Blood Protein-Amido Black Complex
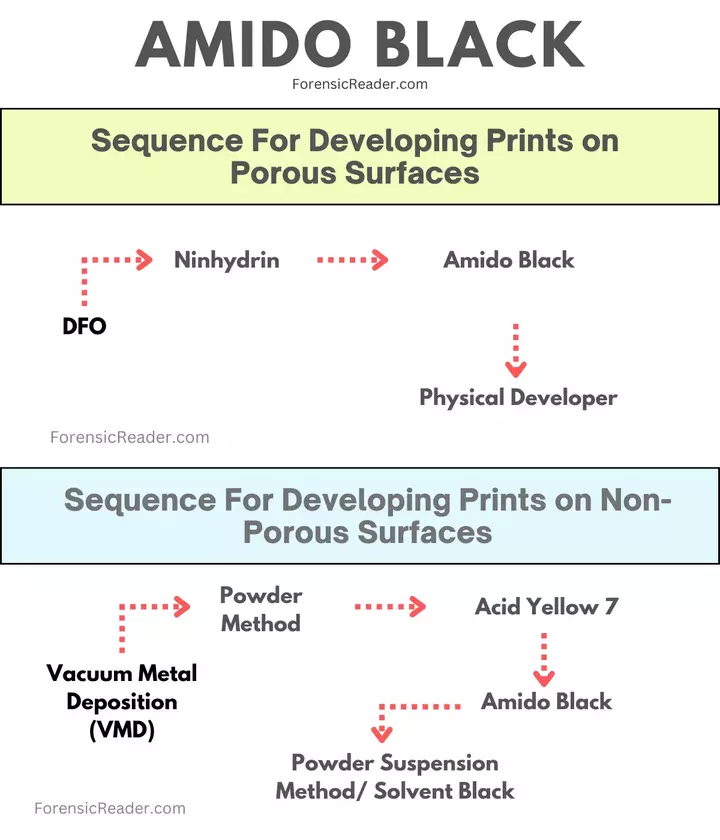
The Sequence of Using Amido Black for Fingerprint Development
Following is the effective sequence of using Amido Black (Acid Black 1) for forensic cases:
A. On Porous Surfaces: DFO -> Ninhydrin -> Amido Black (Acid Black 1) -> Physical developer.
B. On Non-Porous Surfaces: Vacuum metal deposition (VMD) -> Powders -> Acid Yellow 7 -> Amido Black (Acid Black 1) or Acid Violet 17-> Powder suspension or solvent black 3.
Reagent Preparation for Amido Black (Acid Black 1)
There are 3 main reagent categories for the development of blood prints using Amido Black 10B. These are:
- Methanol-Based Method
- Water-Based (Citric Acid) Method
- Water-Based (Sulfosalicylic Acid) Method
Method 1: Methanol-Based Amido Black
In this, methanol is used as a component in staining/fixing blood-staining solutions due to its ability to effectively dissolve and mix with other reagents.
Note: Methanol is a poisonous and flammable substance that may damage certain surfaces like paints, varnishes, and some plastics. Always pretest the surface to ensure that methanol will not cause any adverse effects before using it to fix bloodstains.
Reagent Required:
- Staining or Developer Solution:
- Amido Black: 1 g
- Methanol: 450 mL
- Glacial Acetic acid: 50 mL
- Destaining or Resine Solution (A):
- Acetic acid: 50 mL
- Methanol: 450 mL
- Destaining or Resine Solution (B):
- Distilled water: 1000 mL
Purpose of Reagents:
-> Without fixing the solution, the blood marks will diffuse when the staining solution.
-> Staining solution: to stain the latent blood fingermarks.
-> Destaining or rinse solution: to re-dissolve any remaining dye molecules not bound to proteins.
Preparation of Amido Black Staining Solution
- Dissolve 1 g Amido Black in 50 mL glacial acetic acid.
- Mix with a magnetic stirrer until fully dissolved.
- Add 450 mL methanol, and stir well for 15 to 20 minutes.
- Store the staining solution in a dark glass bottle.
Method 2: Water-Based (Citric Acid) Amido Black Method
An alternative method for developing latent blood prints using citric acid as a fixative.
Reagent Required:
- Citric Acid Stock Solution:
- Citric acid: 19 g
- Distilled water: 1000 mL
- Staining Solution:
- Naphthol Blue Black (Amido Black): 2 g
- Citric acid stock solution: 1000 mL
- Kodak “PhotoFlo 600” solution (optional): 2 mL
- Destaining Solution:
- Destaining Solution (A): 1000 mL of the citric acid stock solution.
- Destaining Solution (B): 1000 mL Distilled water
Note: The use of Kodak PhotoFlo 600 solution fasterns drying, and reduces streaking and water spots.
Preparation of Staining Solution
- Place 2 g of Amido Black in a 2 L glass beaker.
- Add 1000 mL of citric acid stock solution to the beaker.
- Add 2 mL of Kodak “PhotoFlo 600” solution to the beaker.
- Stir the solution on a magnetic stirrer until fully dissolved.
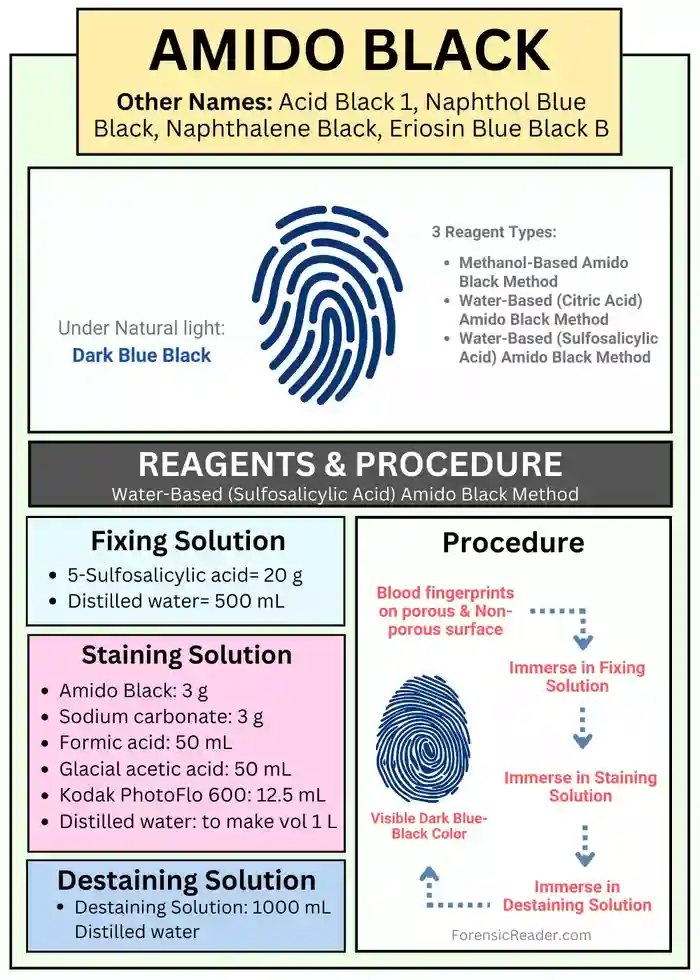
Method 3: Water-Based (Sulfosalicylic Acid) Amido Black Method
Reagent Required:
- Fixing Solution:
- 5-sulfosalicylic acid: 20 g
- Distilled water: 500 mL
- Staining Solution:
- Amido Black: 3 g
- Sodium carbonate: 3 g
- Formic acid: 50 mL
- Glacial acetic acid: 50 mL
- Kodak PhotoFlo 600 solution: 12.5 mL
- Distilled water: to make a total volume of 1 L
- Destaining Solution:
- Destaining Solution: 1000 mL Distilled water
Preparation of Staining Solution
- Add 3 g of Amido Black to a 1 L glass beaker.
- Add 3 g of sodium carbonate and 50 mL of formic acid to it.
- Add 50 mL of glacial acetic acid followed by 12.5 mL of Kodak PhotoFlo 600 solution to the beaker.
- Dilute the mixture to a total volume of 1 L using distilled water.
- Store the staining solution in a dark glass bottle.
Note: For best results, allow the solution to sit for several days before use.
Procedure for Fingerprint Development Using Amido Black (Acid Black 10B)
There are four ways by which amido black or other staining dyes can be used for the enhancement of fingerprints and other impression evidence. These are:
- Immersion or dipping method
- Spraying method
- Abrobent paper method
- Imbedded gel overlay method
A. Immersion or Dipping Method
- Step 1: Fixing. In a tray pour 500 mL of fixing solution and immerse the blood fingerprint into the tray for at least 5 minutes.
- Step 2: Staining. Remove the surface from the fixing solution and immerse into the staining Amido Black solution for 1 to 2 minutes.
- Step 3: Slightly move the acid black 1 solution over the surface for better staining performance.
- Step 4: Destaining. Remove the surface from the staining solution until fingerprint ridges become clearly visible and enhance the contrast between the developed marks and background.
- Step 5: Examine the developed marks and, if necessary, repeat the destaining step until the desired contrast is achieved.
- Step 6: Photograph the resultant blood fingerprints developed using Amido Black.
B. Spraying Method (Best for Vertical Surfaces)
- Step 1: Prepare the area around the bloodstained pattern impression, especially if it is on a vertical surface.
- Step 2: Fix the blood marks on the surface. Use a spray bottle and spray the fixing solution over the surface until the fingermarks area gets wet. Make sure you spray from a distance of 30-40 cm away from the surface.
- Step 3: Leave the surface in normal environmental conditions for about 5 minutes. If the surface gets dried, re-sprayed the fixing solution.
- Step 4: Staining. In another spray bottle, add the acid-black staining solution and sprayed it over the fixed area.
- Step 5: Rest the staining solution for 3 minutes.
- Step 6: Destaining. In a third spray bottle with destaining solution, sprayed lightly over the surface. If possible, the surface should be in the inclined plane so that the extra destaining solution gets washed away.
- Step 7: I would suggest destaining solution best works in the wash bottle rather than the spray bottle. It covers more area and also removes extra stain dye.
- Step 8: Let the surface, air dry or use a low-speed hair dryer in a circular movement.
- Step 9: Photograph the dark blue-black colored fingerprint or impression.
Note: The spraying method can be messy but is particularly helpful for treating bloody fingerprints on vertical surfaces.
C. Using Absorbent Paper
- Step 1: Place a paper or tissue over the bloodstained impression to cover it completely.
- Step 2: Slowly pour the fixative solution from one side, over the tissue, ensuring it covers the entire impression.
- Step 3: Allow the solution to remain in contact with the bloodstained impression for an appropriate time, typically 3-5 minutes.
- Step 4: Remove the fixative solution tissue and replace it with the damped tissue of the staining solution. Allow it for 2-3 minutes.
- Step 5: Resine the developed fingerprints with a third set of tissue with the destaining solution.
- Step 6: Photogprahy and documentation.
D. Embedded Gel Overlay
- Step 1: Use any of the above methods for fixing the latent bloodstains.
- Step 2: In a tray or beaker, place the gel side of the white lifters over the staining solution. Let it soak for 3 minutes.
- Step 3: Remove the gel lifter from the staining solution and carefully (from one side) place it over the stain. Use a fingerprint roller to slightly dampen the lifter towards the impression.
- Step 4: Carefully, lift the gel from the print after 30 minutes, and pour a small amount of a destaining solution over the original stain.
- Step 5: Allow it to air dry and photograph the stained prints.
- Step 6: Photograph the stained prints.
- Step 7: Lift the gel and protect the lifted impression with the acetate covering that came with the lifter.
Note: The embedded gel overlay method is useful for staining weak bloodstains by using gel lifters impregnated with the dye.
Observation and Result
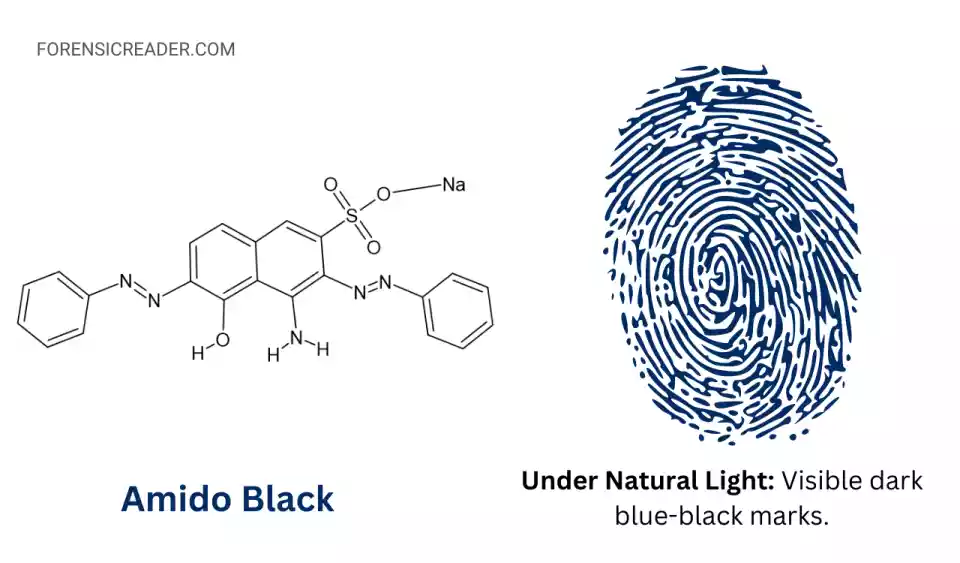
- A. Under Natural Light: Visible dark blue-black marks.
- B. Light Deposit of Blood Marks: Crisp ridge details and favorable for forensic fingerprint comparison.
- C. Light Developed Marks: Lack or fairly less amount of blood, may require a longer staining process.
- D. Heavy Deposit of blood marks: Smudge ridge details and may require a longer destaining process.
Advantages
- Visible stains the blood proteins, providing dark blue to black ridges that can be visible without any alternative light source.
- Effective on both porous and non-porous surfaces.
- It best performs on light-colored backgrounds and provides good contrasting finger marks.
- Works best for light to medium blood deposits.
Disadvantages
- False positive result with other proteinaceous materials such as egg white, and whey proteins.
- Not suitable for darker surfaces. Other staining solutions such as acid yellow 7 (fluorescent staining dye) must be favored over acid black 10B on dark-colored surfaces.
- Time-consuming because of the preparation of fixing, staining, and destaining solutions.
Precautions
- Amido Black can’t be used as a presumptive test for blood detection. Other confirmatory tests for blood should be performed.
- Make sure you always fixed the marks before using the staining and destaining solution.
- Amido Black doesn’t need that much for staining, 3 minutes is more than enough. Over-staining makes the blood prints soaked heavily in the reagent.
- Also, avoid over-soaking in destaining. Remove the print surface as soon as the ridges become clearly visible.
- Follow the proper sequence. You should follow the proper sequence that was stated earlier if you’re dealing with forensic evidence. This will maximize efficiency and be less time-consuming.
- Must maintain the chain of custody such as photographs and detailed notes on the development process and result.
General FAQs
Amido black vs luminol; which is better?
Amido black is better for the enhancement and visualization of suspected bloodstain-patterned evidence but lacks of sensitivity. While luminol is used mainly as the measure of blood detection and its sensitivity is about 1:10000 dilution of blood.
What is amido black used for in forensics?
Amido black is mainly used for two purposes. One is the development of bloody fingerprints or other protein marks on porous and non-porous surfaces. Secondly, used as staining dyes in biological microplate cultures and other assays
What does Amido Black react with?
Amido Black reacts with blood protein and forms a dark blue-black compound. This is because of the interaction of blood protein molecules with a cationic charge that electrostatically attracts with the negatively charged acid black dye. This attraction leads to the formation of dark-colored products and results in visible blood marks.
Is it possible to extract DNA after treatment with Amido Black?
There is a minimal chance of obtaining DNA after treating with Amido Black. However, it depends on whether you’re using a methanol-based or water-based reagent. Methanol-based reagents can denature proteins to a higher degree than water-based ones if the fixing time is extended. If DNA extraction is needed, make sure to collect DNA samples first.
References:
- Fingerprints and Other Ridge Skin Impressions [Researchgate]
- Prizeman, T. (1998) Enhancement of Fingerprints in Blood – Optimization of Amido Black Formulations, PSDB Student Placement Report.
- Faragher, A. and Summerscales, L. (1981) Fingerprint Enhancement Using the Amido Black Technique after Chemical Fixation, Forensic Science Service UK, Technical Note 240. London: Home Office
- Enhancement techniques for fingerprints in blood by Sears, Vaughn G. [Link]
- Hussain, J. I. and Pounds, C. A. (1989) The Enhancement of Fingerprints in Blood Part II: A Modified Amido Black Staining Technique, Forensic Science Service UK, HO CRE Report 649, June. London: Home Office.
- Friction Ridge Skin: Comparision and Identification of Fingerprints [Google books]
- Fingerprint Development Techniques: Theory and Application [Wiley]
- Sears, V. G. and Prizeman, T. M. (2000) ‘The Enhancement of Fingerprints in Blood – Part 1: The Optimization of Amido Black’, J. Forens. Ident., vol. 50 (5), p 470.
- Enhancement of fingerprints in blood–part 2: Protein dyes.” Journal of Forensic Identification, by Sears, et.al. [Link]
- Home Office Fingerprint Source Book [Link]

FR Author Group at ForensicReader is a team of Forensic experts and scholars having B.Sc, M.Sc, or Doctorate( Ph.D.) degrees in Forensic Science. We published on topics on fingerprints, questioned documents, forensic medicine, toxicology, physical evidence, and related case studies. Know More.