Forensic fingerprint experts have a set of guidelines that are needed to follow to compare fingerprints. But in this simple guide, I will tell you how you can compare fingerprints at home.
You only need a questioned (unknown fingerprint sample) and a reference (known fingerprint from the individual).
If you’re doing only one set of fingerprints to compare, the process could be easy and I will suggest going with method 1 (stated later).
And in case, there are more than one set of fingerprint to compare (in most cases, you may have more), as a forensic expert I would suggest you go through each step to compare fingerprint at home without any forensic tool, even magnifying glass.
Preliminary Steps in Comparison of Fingerprints at Home
In preliminary steps, you need to do three major tasks: collection, digitization, and cropping. Each step is necessary to get a good-quality of fingerprint image for comparison.
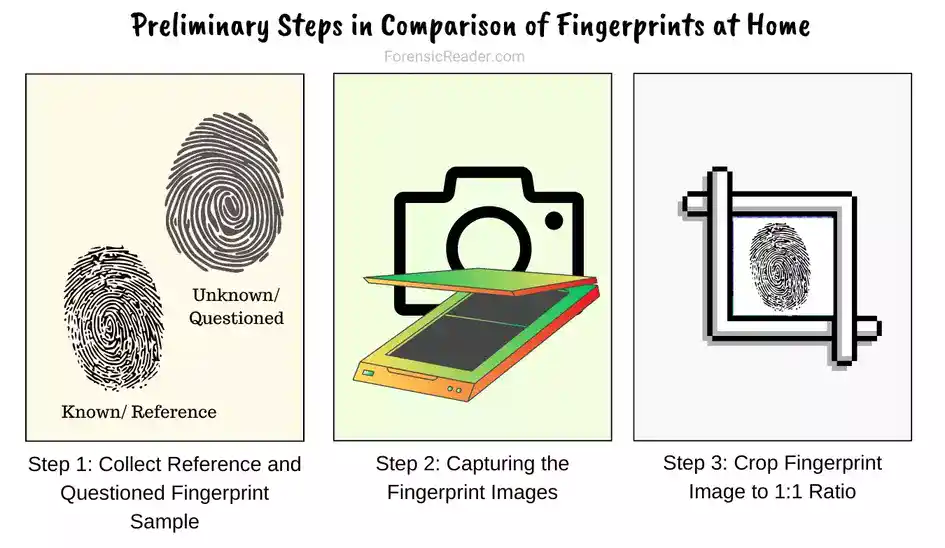
Step 1: Collect Reference and Questioned Fingerprint Sample
If you already have a questioned (unknown) fingerprint that is visible, you can use your smartphone flashlight and click a photograph of it. Or, if the prints are partially visible, you can use non-standard DIY fingerprint powders to develop them.
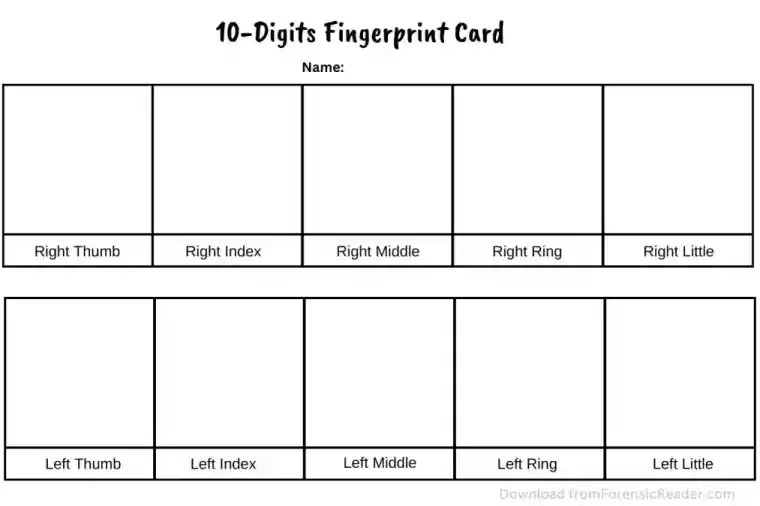
For collecting standard or reference samples, you can use a stamp pad and ink down all the fingerprints from the individuals. For this, I would recommend you save the following 10-digit card and use it to register finger marks.
Step 2: Capturing the Fingerprint Images
Take the collected samples, and using a high-resolution camera or scanner, capture the images.
Tip: Always use same means for capturing fingerprints. If you’re using a camera, all the fingerprints should be captured from the same camera, if possible. Doing this saves you a lot of time at cropping, resizing, and realigning.
- Images taken from the camera should contain higher details with at least a resolution camera lens size of 8 MP.
- For scanners, make sure to scan fingerprints at least 300ppi.
- Before proceeding further, make sure all images are in focus with good ridge details.
- Mark each fingerprint image with respective details such as marking “R” for the reference sample and “Q” for questioned/unknown sample.
- For more than one sample, use numbers.
- Example: Reference sample 1 should be marked as ‘R1‘
- Questioned sample 1 should be marked as ‘Q1‘
- For marking, you can either rename the saved image file or watermark it with other editors. Renaming is easy and recommended.
- Make a separate folder (in laptops) or album (in mobile gallery) for questioned and reference samples.
That’s all done with the basic.
Note: If you doing a simple comparision, I would suggest to take photogpraphs from your smartphones. There are good camera phones in the market.
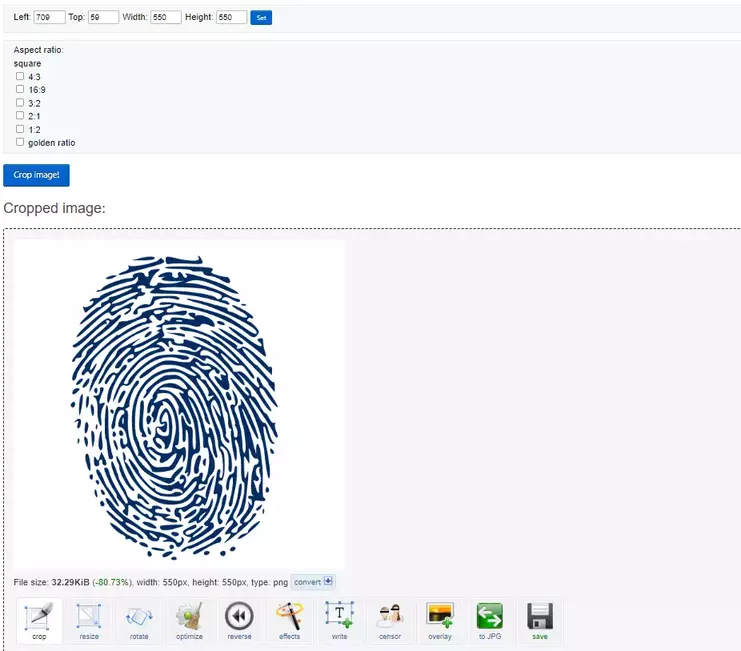
Step 3: Crop Fingerprint Image to 1:1 Ratio
Cropping to 1:1 (square) helps to make the fingerprint image more focused. To crop, I would suggest using online tools such as Ezgif online editor. Follow the steps:
- Choose your image file from your mobile or pc.
- Click on upload.
- Select “Square” by scrolling down
- Realign the square-cropped part to the center.
- Click on “Crop.”
- Click on “Save.”
Methods of Comparing Fingerprints at Home
There are three methods that you can use to compare fingerprints at home. All these methods nearly give you 100% accuracy without the need for a forensic expert or forensic tools.
These methods are:
- Superimpose method using Image Editor tool
- Comparing the continuity of ridges
- Tracing method using tracing paper
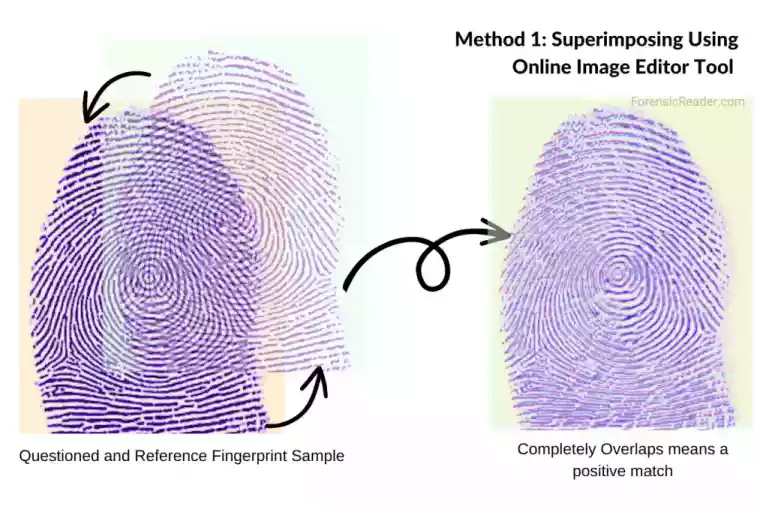
Method 1: Superimposing Using Online Image Editor Tool (Easy and Recommended)
This is the simple way by which you can compare fingerprints using your smartphones or pcs.
You only need an image editing tool.
There are tons of apps but I am going to use the most common one and widely used for creating online graphics i.e. Canva.
Steps to compare fingerprints in your smartphone:
- Download the Canva app from the app store.
- Open the app and create a free account.
- Click on the “+” button from the bottom menu.
- Click on “Custom Size.”
- Enter “1024” in the width and height column.
- Click on “Create a New Design.”
- Click on “+” button and hover to the “Upload”
- Click on “Upload files” and upload the first image of the fingerprint (questioned/unknown).
- Align the uploaded image to the blank canvas.
- Again click on the “+” button and upload the second fingerprint image (known).
- Realign and zoom in/out the image above the previous one.
- In the bottom menu, hover to “Transparency” and slowly decrease its value.
- If both fingerprints are the same, then they will completely overlap the fingerprint ridges.
- If both fingerprints are different, ridges will not be superimposed properly.
Steps to compare fingerprints in your laptop and pc:
For laptop users, I’m again going to use Canva but this time its web application. Here are the steps:
- Open a browser and visit canva.com.
- Sign in with your email id.
- Click on “Custom Size.”
- Enter “1024 x 1024” in each of the width and length boxes.
- Upload both the known and unknown cropped fingerprint images to the Canva library.
- Move the unknown fingerprint image to the editing space and realign it.
- Move the second known fingerprint sample to the editing space and realign it over the first one.
- In the top menu, click on the “Transparency” icon and start decreasing the value to a point when the background finger ridge details become visible.
- If both are similar, they perfectly align to ridge curves, and if not, it means they are from different fingers.
- Repeat the process for all the known fingerprint samples.
Method 2: Comparing the Continuity of Ridge Details
The idea here is to check for the continuity of ridge details originating from an unknown questioned fingerprint sample to know fingerprints.
The steps are nearly the same as above if you’re using Canva. But there are a few additional steps such as cropping to half and using the “Draw” pen tool by Canva to mark the ridges.
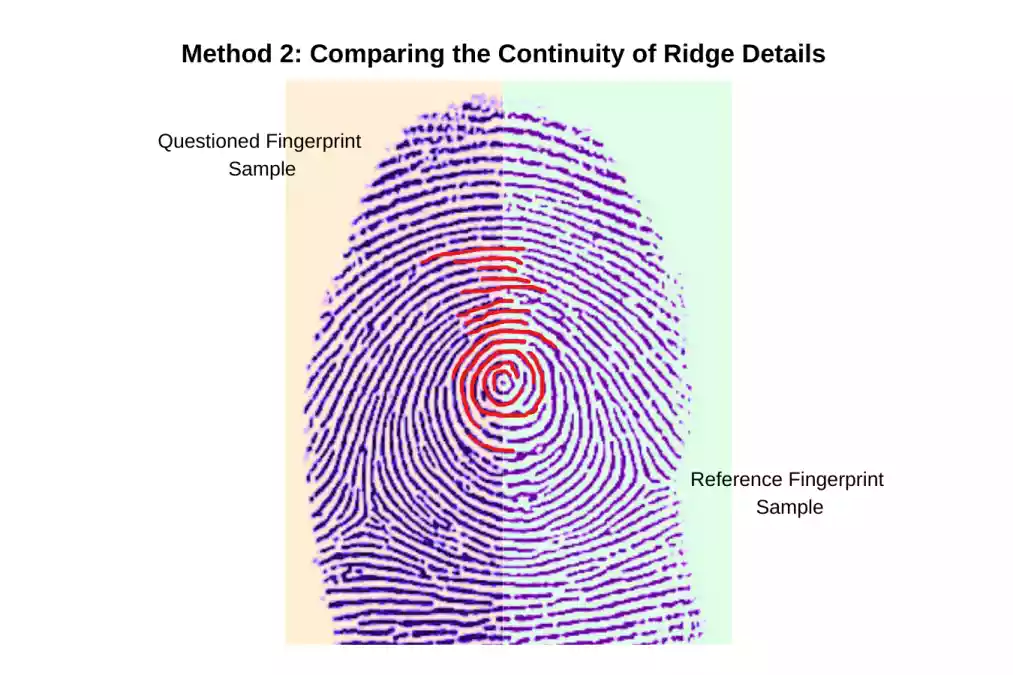
So, here are the steps for tracing the continuity of ridge details using a smartphone app:
- After uploading the images, open the unknown fingerprint image in the blank canvas.
- Click on the “Crop” button.
- Crop the image to half (cropping the fingerprint image from the central ridge or core).
- Repeat the process for the second known fingerprint image.
- Align the second image to the core of the first image (core-to-core).
- Click on the “+” button at the bottom and click on the “Draw” pen icon.
- Start tracing ridges from the first image and continue to the other.
- Trace at least 5 to 6 ridges to check for similarities.
- If similarities appear, the ridges should overlap with the second known fingerprint sample.
- And if no overlapping occurs, it means the prints are different.
And, if you’re using a desktop, here is the step-by-step guide to compare fingerprints using the continued tracing method at home:
- Upload both the known and unknown fingerprints to Canva.
- Move the first unknown fingerprint image to the blank Canva.
- Click on “Crop” and cut them into half from its core.
- Do the same for the second image.
- Align both images from core to core.
- Click on the “Draw” icon on the left side of the menu.
- Use the fine line color pen and start tracing the ridges from the unknown to the known fingerprint sample.
- If ridges overlap, it means both prints are from the same finger and belong to the same person.
- In case no retraced ridges overlap, it means it is a negative match.
Method 3: Comparing Using Tracing Paper
If you have time and want to do extensive analysis or the unknown/questioned fingerprints are partial that I would suggest to with the tracing paper technique.
It is also a great activity for the school students. I’m going to state a few quick points about this method because I already wrote a dedicated article on it. [Read More: Compare Fingerprints At School with Tracing Paper Method].
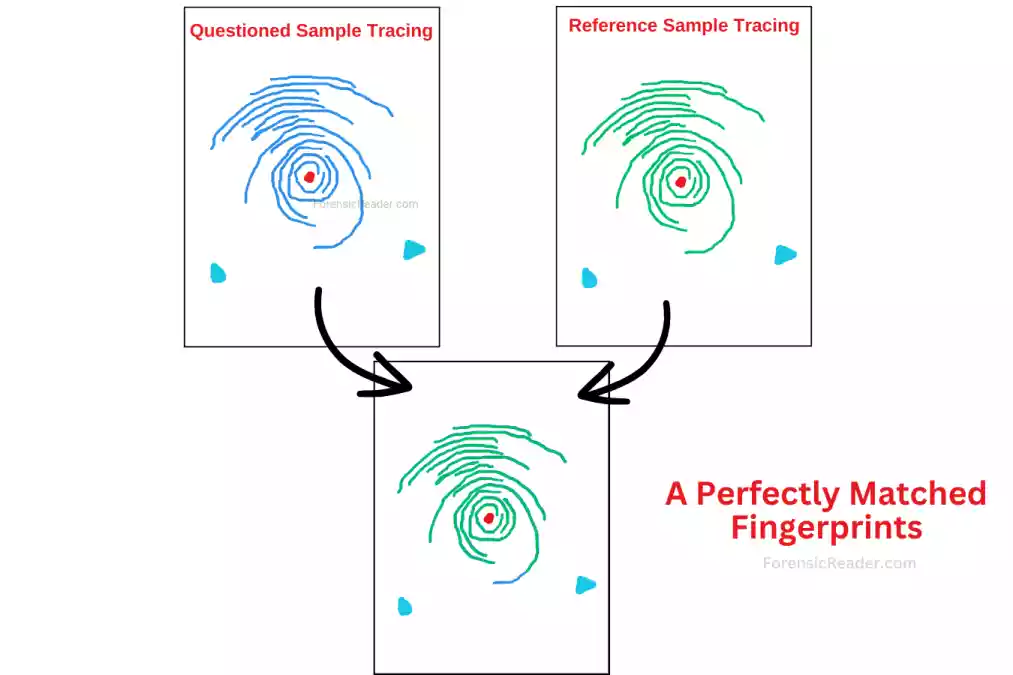
Steps involved:
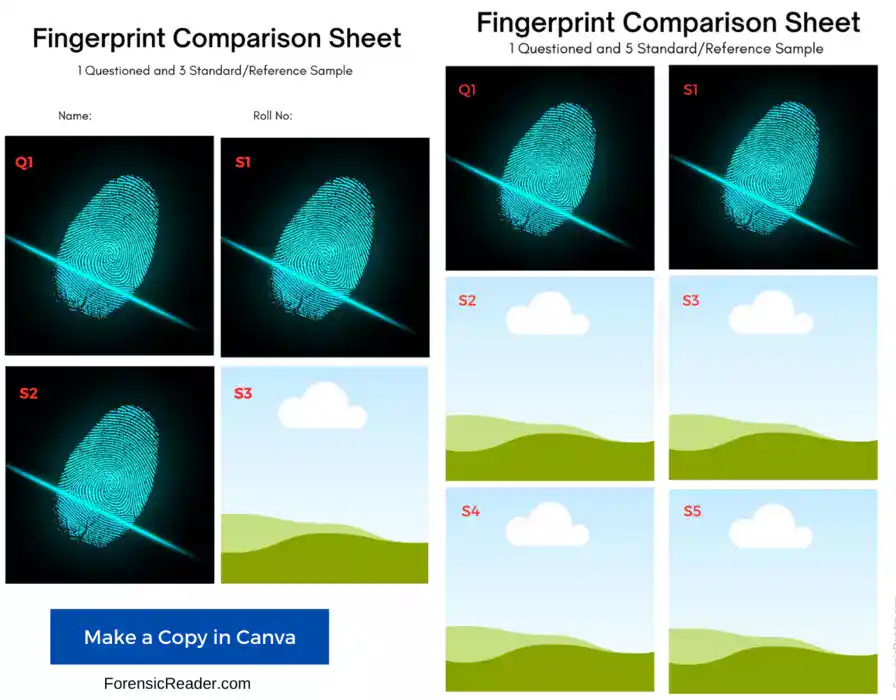
- Prepare the comparison sheet (get from below) from known and unknown fingerprint images.
- Take a printout of it.
- Use tracing paper, and mark core and deltas in questioned fingerprint sample.
- Superimpose the marked core and deltas to each of the known/reference fingerprint samples.
- If the core and deltas overlap, trace a ridge directly above the core and matched it with the reference sample.
- You can do this to delta parts too if it is a case of partial fingerprint.
- Continue the tracing for at least 6 ridge curves.
- If fingerprints are the same, they must have the same ridge curves that overlap with traced lines on tracing paper.
- Different ridge characteristics mean fingerprints belonged to different fingers.
This method is time-consuming, so only use this method, if you want to illustrate or teach others about comparing fingerprints without digital means.
And that’s all. All these methods are totally made by me, and if you need my help, just pin your questions or thoughts in the comment section.

FR Author Group at ForensicReader is a team of Forensic experts and scholars having B.Sc, M.Sc, or Doctorate( Ph.D.) degrees in Forensic Science. We published on topics on fingerprints, questioned documents, forensic medicine, toxicology, physical evidence, and related case studies. Know More.