Forensic fingerprint experts follow a set of rules for comparing fingerprints. But in this simple guide, I will show you how you as a teacher can create a fun activity for their students who have no prior knowledge of comparing fingerprints.
For this forensic fingerprint comparison school activity, you don’t need any sophisticated tools. The only things you may require are the following:
- A 10-digit card (I made one)
- Ink pad for inking fingers for prints.
- 5″ x 5″ tracing paper (2 for each student)
- Fine Marker or color pens
- 30 minutes of a class period
This school activity for comparing fingerprints is simple and best for 6th to 10th grade students. Students in the lower grades (6th to 9th) may enjoy it, while high schoolers may find it too easy.
Step 1: Collect Standard and Questioned Fingerprint Samples
As it is for comparison, I would suggest you capture the image of your own fingerprint on a 10-digit fingerprint card.
You can then use one of the fingers as questioned and the rest of them as standard. And don’t forget to include the same questioned fingerprint in one of the standards to get a match.
For collecting standard or reference samples, you can use a fingerprint stamp pad. and ink down all the fingerprints.
You can save the following image or take a snapshot of a 10-digits fingerprint card and registered your fingerprint in each boxes.
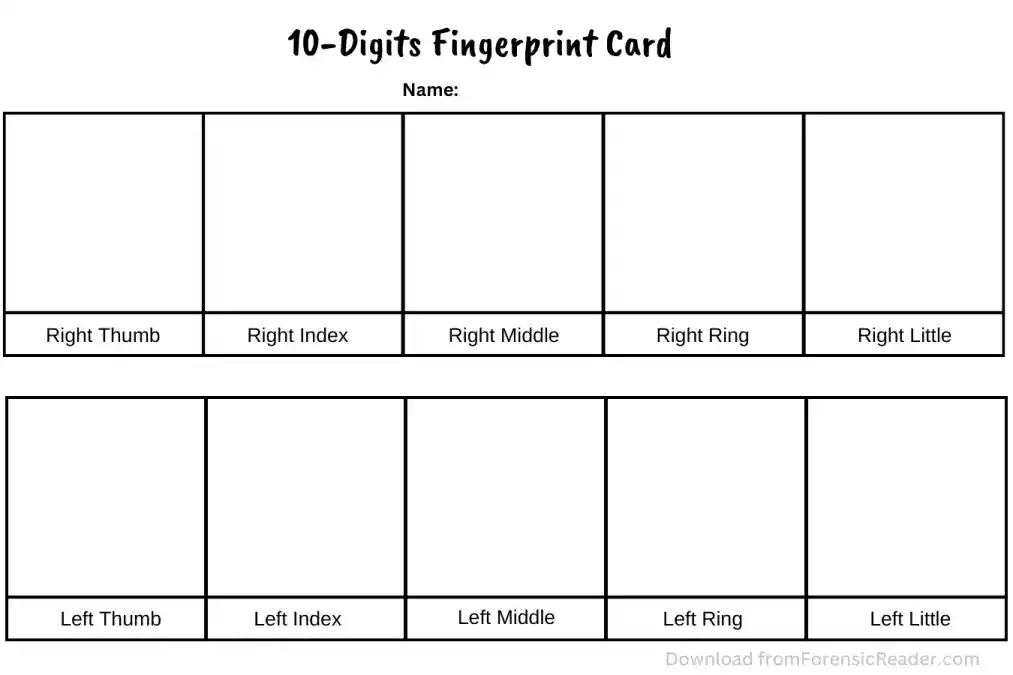
You can also check the full procedure on how to fill 10-digit fingerprint card with best practices.
General Forensic Terms Used:
- Questioned/Unknown Fingerprints: Unkown prints that are needed to compare with known prints to trace their identity. For example, unknown fingerprints are found in case of robbery.
- Standard/Known/Reference Fingerprints: Known fingerprints that have a known identity to them. For example, police take fingerprints from 5 suspects in order to compare them with the fingerprints found in a robbery case.
Step 2: Scan the 10 Digit Fingerprint Card
Use a scanner to collect a virtual image of the collected fingerprints. Before scanning, make sure the prints are dried on the 10-digit card.
Set the pixel per inch (ppi) setting to 300ppi. Below this, the ridge details (fingerprint lines) will not appear clear on cropping (which is the next step).
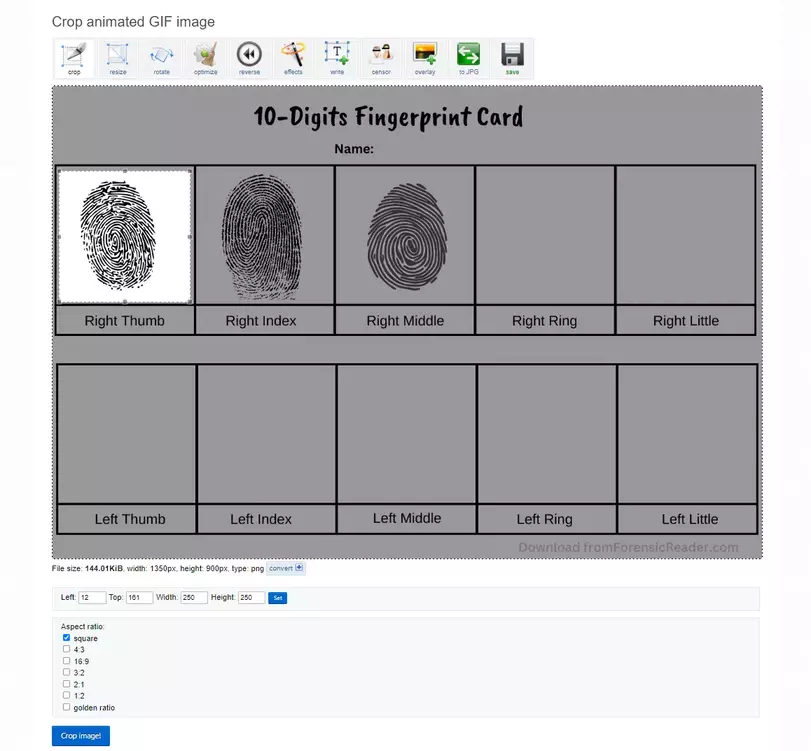
Step 3: Crop Fingerprint Image to 1:1 Ratio
Cop each of the fingerprints in the card to a ratio of 1:1. Cropping to 1:1 (square) helps to make the fingerprint image more focused and zoomed.
To crop the image in 1:1, I will recommend using online tools such as Ezgif online editor. Here are the steps:
- Visit Ezgif online editor.
- Choose your image file from your mobile or pc.
- Click on “Upload.“
- Select “Square” by scrolling down.
- Realign the square-cropped part to the center.
- Click on “Crop.“
- Click on “Save.”
Here is the image that I used for cropping from a ten-digit fingerprint card.
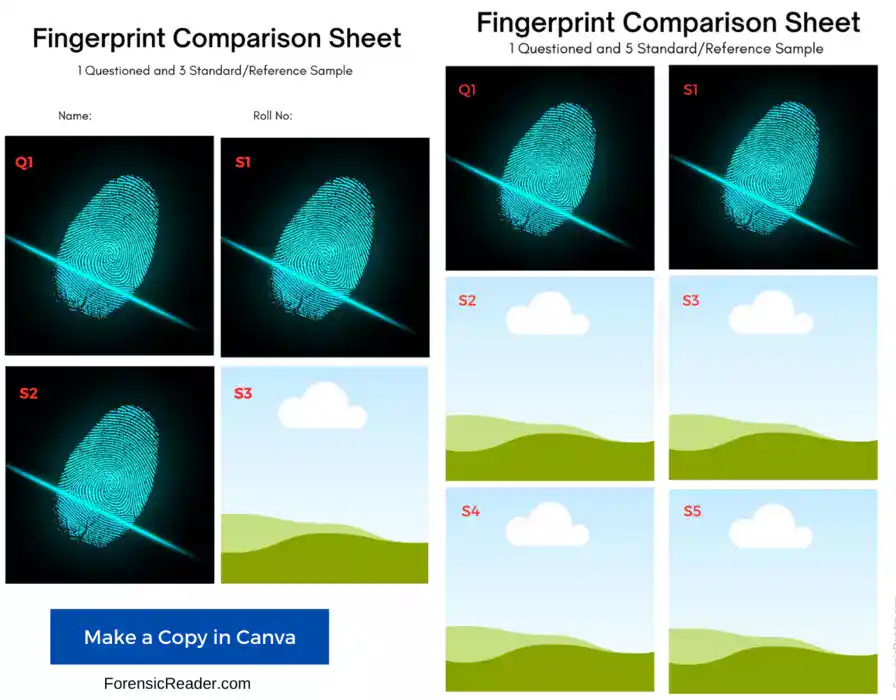
Step 4: Prepare A Fingerprint Comparison Sheet
Take each of the fingerprint samples and make it enlarge so that the ridge details will easily visible.
I also made a simple editable fingerprint comparison sheet of A4 size. You just have to open it in Canva (create a free account) and replace the fingerprint images.
- Sheet 1 contains 1 questioned and 3 standard/reference samples. It will be perfect for 6th to 8th-grade students.
- Sheet 2 contains 1 questioned and 5 standard/reference samples. It will get good for high school students.
How to use Fingerprint Comparison Sheet:
- Make your own copy by following the link.
- Sign in with Canva (it’s free).
- Upload your cropped fingerprint images.
- Drag each fingerprint image in the “Image Box“. (It will automatically insert the image in that box.)
- Fill all of the images in the rest of the image boxes.
- For a positive comparison result: add at least one same image in questioned and reference image boxes.
- For negative comparison results: don’t add any duplicate images in boxes.
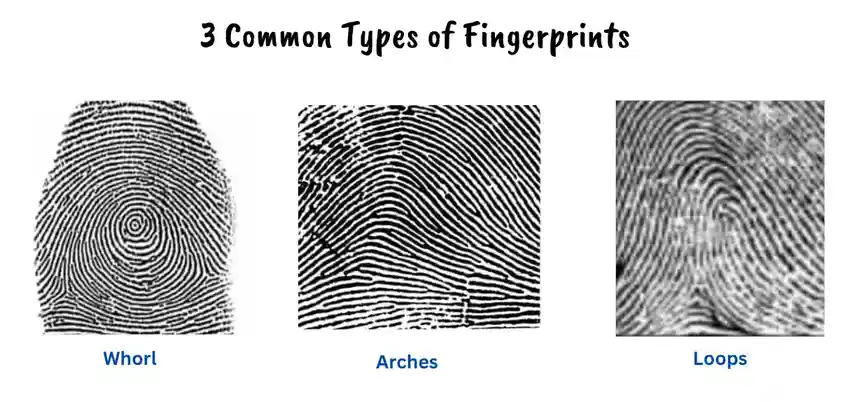
Step 5: Classify Fingerprint Pattern (optional)
There are three main types of fingerprints and for simplicity, I am going to state the main three classification pattern types. However, you can be referred to different types of fingerprint patterns.
Here are three main classification patterns:
- Whorls: Circular or spiral ridges around a central point.
- Arches (A): Ridges enter from one side and exit on the other side making a central wave-like structure.
- Loops: Ridges enter from one side and recurve back to same side and end. It’s like you make a roll from a single thread.
Based on the above image, define the pattern in each of the fingers and make a 10-digit fingerprint table.
If the fingerprint pattern doesn’t fall in the above category, for simplicity, you can tell students to mark them as “Accidental.“
Read More: Henry Fingerprint Classification System: Key, Major, Primary, Secondary, Subsecondary and Final
Please note: Loops can be radial and ulnar. Radial loops (R) end towards the thumb while ulnar loops (U) end towards pinky finger.
Step 6: Comparison of Similar Pattern Types Using Tracing Paper
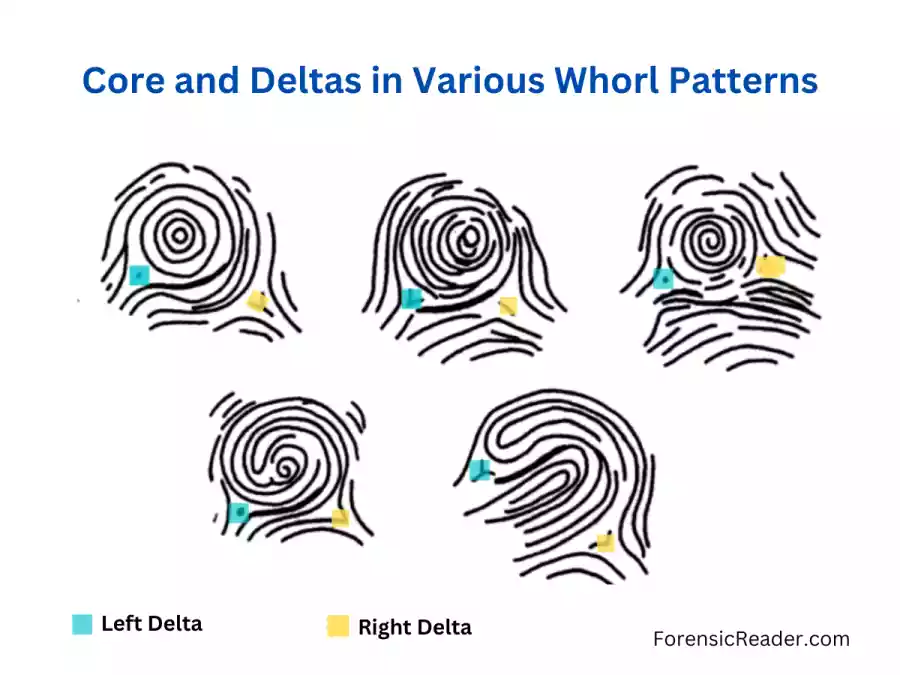
The tracing paper method is simple and effective. The process starts with identifying the center point (core) and deltas.

For 6 to 8th grade students you might have to instruct how to find deltas and core in a fingerprint. And for high school students, you only have to instruct them to first mark the core and deltas.
- Instruct students to use fine-tip pens or fine markers.
- Make two 5″ x 5″ tracing papers and hand over each of them to students.
- Using the first tracing paper, teach them to mark the core (as stated in the image) from the questioned fingerprint sample (Q1).
- Now, move to find deltas and mark them, if any, in questioned fingerprint sample (Q1).
Note: All fingerprint have at least a core but not all fingerprints have deltas. Example: Whorls have two deltas, loops have a single delta and while arches have no deltas.
Make sure you mark all deltas and core in the Q1 sample. Here is an example of various core and deltas in various whorl patterns.
Step 7: One-to-Many Comparisons
In this step, instruct students to superimpose the core and delta to the known or reference sample.
- Place the marked core in such a way that it will align with the core of the reference fingerprint sample.
- Now, check the marked delta overlaps with the reference sample (R1) or not.
- Repeat the process for every reference sample.
Note: If the questioned sample are arches, it only have one core and no delta. So, you teach students to omit any reference sample that have deltas.
In some cases, there are ridges that might not fully overlap because the questioned and reference sample is of the same size. However, if you use my comparison sheet with Canva, you don’t have to worry about the sizing issue.
Step 8: One-to-One Comparisons of Fingerprints
Once a reference and questioned sample have similar core and delta points, detailed one-to-one comparisons is needed. For this:
- Use the second 5″ x 5″ tracing paper and instruct them to mark the core and delta for the possibly matched reference sample.
- Carefully, tell them to retrace a ridge directly above the core, from start to end. Stops when the ridge abruptly ends.
- Do the same to match the (core and delta) in reference sample. Trace the right above the ridge.
- Instruct students to retrace the ridge above the previously retraced ridge and similarly to the reference sample.
- In short, retrace questions and reference fingerprint samples one by one.
- Repeat this for at least 6 to 8 ridge retraces.
Here, is the image representation that should be done.
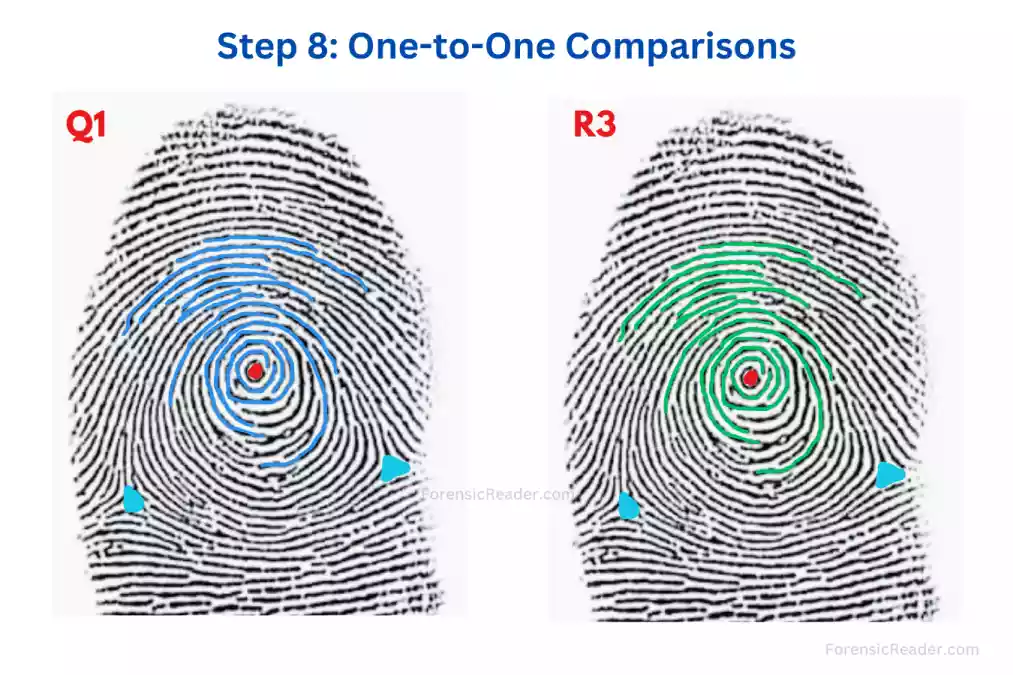
Quick Note: In any forensic fingerprint comparison (parital fingerprints), there is a minimum of 8 ridge characterstics should be needed to opinion whether a questioned and reference sample is a match or not.
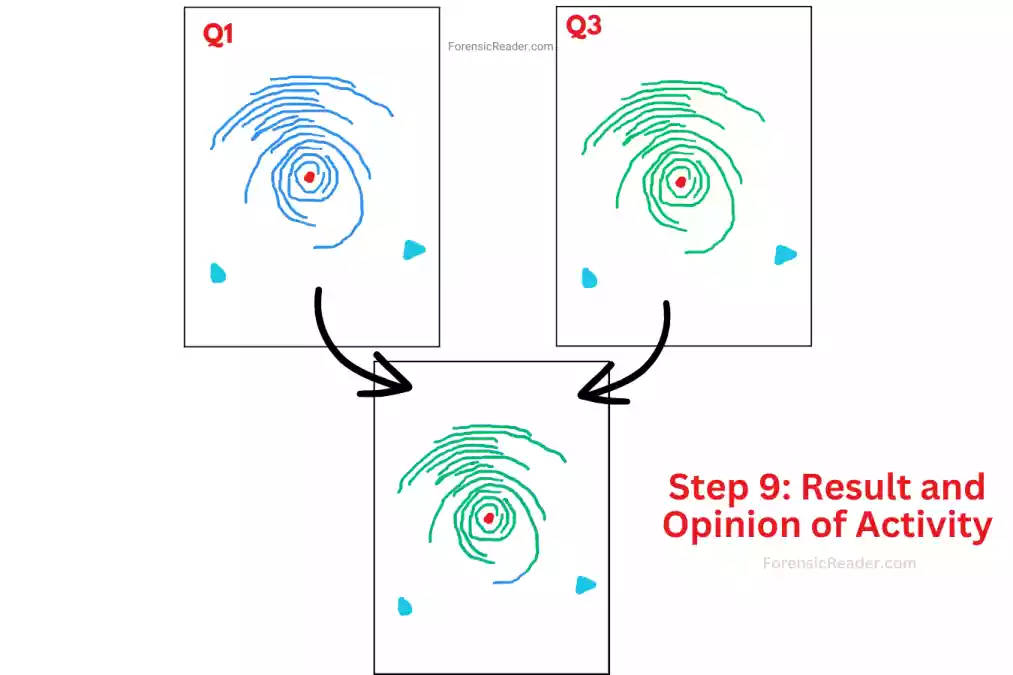
Step 9: Result and Opinion of Activity
Superimpose the both traced paper one above another.
- If they fully align with each other. It is a positive match.
- If they don’t, prints belonged to different fingers.
While writing the opinion, you should instruct students to write in a forensic tone. The following is an example.
Opinion if Matched: I “NAME”, “designation” found questioned sample Q1 has 8 similarities with the reference sample “R number.” On the basis of that I opine that Q1 and “R number” are the same or identical.
Opinion if Not Matched: I “Name”, “designation” had found no minimum 8 similarities in any of the reference samples with questioned sample Q1. On the basis of that I opine that Q1 and any and all R1, R2, and R3 are different.
It is not the exact tone but I made it simple for students.
That’s all teachers. Thank you for reading it.
I hope I didn’t disappoint you and the content is helpful to you. Happy teaching!
Read More: How to Compare Fingerprints at Home? A Simple Guide by Forensic Expert.

FR Author Group at ForensicReader is a team of Forensic experts and scholars having B.Sc, M.Sc, or Doctorate( Ph.D.) degrees in Forensic Science. We published on topics on fingerprints, questioned documents, forensic medicine, toxicology, physical evidence, and related case studies. Know More.