Key classification is the last subdivision of Henry Fingerprint System, mainly used by the FBI, USA. Here, ridge counts of the very first loop of the 10-digit card are used as the key division values, except loops on the little finger. And their values rest at the beginning of the classification line.
The above is the short intro. Later, in the post, you will get to know how to calculate key division numbers in different sets of fingerprints such as scarred and amputated fingers.
Rules of Using Key Division
- Fingers: All fingers except little fingers
- Position: First value in classification line i.e. before major division
- Patterns: Loops
- Values: Ridge counting for loops
- Numerator: Value always go to the numerator
- Denominator: Not used
Values for Key Classification of Fingerprints

- The first ridge count loop in the 10-digit card from the right thumb (finger #1) to the left ring (finger #9).
- In this process, little thumbs i.e. finger #5 and finger #10 are not included.
What fingers are not included in looking for a loop in the key division?
Finger number 5 (right little) and finger number 10 (left little) are not included in the key division of the fingerprint system.
Why are little fingers excluded in Key Classification?

Key classification doesn’t include little finger’s values. This is because right and left little fingers are exclusively used for classifying fingerprints in the final division system, which also uses the same (loop counts) values for grouping.
So, it is not viable to include little fingers too in the key division as it will result in unnecessary extra prints with the same conditioning parameters i.e. loop counts.
This makes classifying not complex but time-consuming. Because grouping the same parameters in two groups leads to a bigger search group that makes it less efficient and costs more time for identifying an individual print.
That also raises the question, what’s the point of having two distinct divisions if they share the same (a part of) ridge count parameter?
How to Obtain Key Classification of Fingerprint Values?
With the help of the following example, I will tell you how you calculate the key division values.
Step 1: Identify all loops pattern
The very first step is to identify loops patterns that are appearing on the card and values are extracted and written on a 10-digit card.
Following is the example of one. You can also check my other article on what are the rules for filling 10-digit cards.
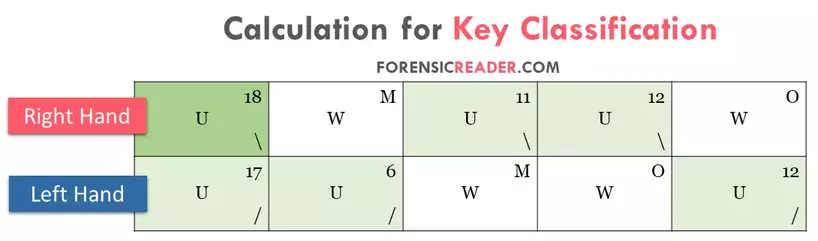
Step 2: First loop from right to left
Start searching for loop patterns from the right thumb (finger #1) to the right ring (finger #4). If the right fingers are lacking, look for the same on prints from left thumb (finger #6) to left ring (finger #9).
The ridge count of the very first appearance of the loop is used for defining this classification value.
Step 3: Placing Value in Henry Line
The value always sets in the beginning and above the henry classification line. This is how it looks.

Key Classification in Scarred and Amputated Fingers
A. Scarred Fingerprints
| Possible Rule | Values |
|---|---|
| Rule 1: Fully Disfigured first finger with opposite corresponding loop | The left-hand finger’s loop count values are assigned. |
| Rule 2: One finger is partially scarred with a loop pattern | • If the opposite finger has a loop: Borrow ridge count value of that finger. • If different general patterns: probable count value assigned. |
| Rule 3: Fully scarred right-hand fingers | Left-hand non-scarred finger value is used. |
| Rule 4: Both hands’ fingers are fully disfigured | No key classification |
| Rule 5: Bandaged prints | Prints are taken after healing |
B. Amputated Fingers
| Possible Rule | Values |
|---|---|
| Rule 1: Amputated Finger | Patterns from opposite fingers |
| Rule 2: Both hand fingers are amputated | Key classification is omitted |
| Rule 3: All fingers are Amputated | Key classification is omitted |
| Rule 4: Both Hands are Amputated | Footprints are used |
Practice Worksheet For Key Classification
Practice #1
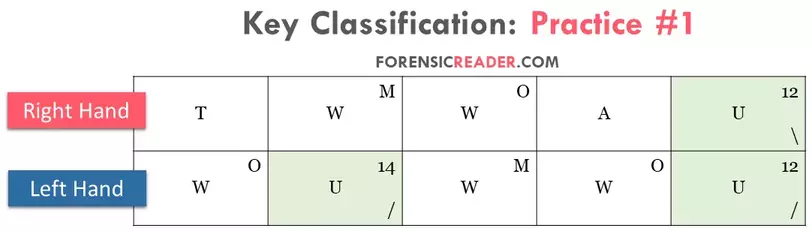
- First loop from Right to Left, except little finger
- Left Index finger= Ridge count=14
- Classification Value= 14
Practice #2: If No Loops except Little Finger
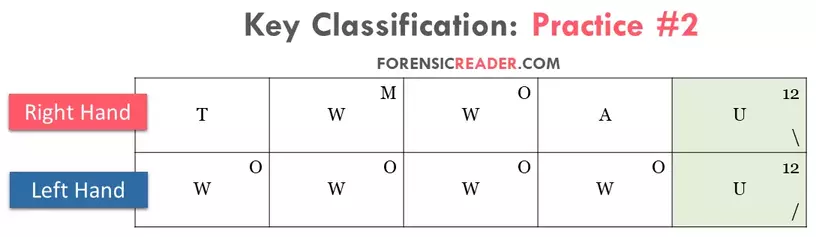
- First loop from Right to Left, except little finger
- No fingers have loops
- Classification Value= Omitted
Frequently Asked Question
1. How does one obtain key classification?
The values are obtained by ridge count values of the first finger that appears on the ten-digit card.
2. What classification is included between the key and primary classification in the fingerprint card?
Major classification is placed between the key and primary classification in the fingerprint card.
3. What is the concept of key classification in case no loops appear in a set of prints?
If there is no loop appears in any of the eight fingers, there is no key division.
Also Read:
- Primary Classification of Fingerprint: Rules, Procedure And Worksheet
- Secondary Classification of Fingerprints With Small Letter Grouping
- Major Classification of Fingerprint: Rules, Procedure And Worksheet
- How Fingerprints are Classified using NCIC Classification System?

FR Author Group at ForensicReader is a team of Forensic experts and scholars having B.Sc, M.Sc, or Doctorate( Ph.D.) degrees in Forensic Science. We published on topics on fingerprints, questioned documents, forensic medicine, toxicology, physical evidence, and related case studies. Know More.