Photographing shoes and tire marks is challenging in snow. Here, forensic experts need to prepare impressions with contrasting material, and the rest of the procedure is the same as photographing impressions with forensic scales on soil and sand.
With this post, I am going to state how to take photographs of shoe marks or any 3D impression in snow for forensic crime investigation.
Why Isn’t Photographing Enough for a 3D Snow Impression?
Every impression should be photographed. But they are not capable of capturing that much detail as a cast for impression such as shoe marks, tire marks, footmarks, etc. Check why it is important to have a cast along with photographs of impressions.
In general, the details of photographing an impression are reasonably good. But with snow, the detailing of photographs suffers most because of:
- Lack of contrast of white-on-white impression and
- Translucent nature of snow
This is the reason why extra preparation (contrasting agent) is required even while photographing.
In short, the rule of thumb: Photography is always done whether casting or not. And casting should be done for every 3D impression over snow (or any substrate).
Snow Types and How They Affect Photography Impressions
The degree of detailing in photographs is influenced by the type of snow. If the snow is dry or grainy, it is tough enough to capture the impression (like walking on the road). However, if the snow has moisture, it can retain a good negative 3D shoe or tire mark.
For instance, the most common snow types are fresh, wet, dry, loose, compact, slushy, refrozen, and granular. Other factors such as falling snow (fill the depth of the mark), melting (dilute the edge details) and sublimation (irregularity in edges) also affect the ability to develop and photograph marks on snow.
Enhancing Snow Prints Impression Using highlighting Materials
The purpose of using highlighting material is to increase contrast and enhance the details that can be photographed. Thus, every snow impression should be first highlighted with the contrasting agents.
Common recommended highlighting agents are
- Snow Print Wax
- Snow Impression Wax by Sirchie
- Krylon Gray Primer
- Snow Print Powder
1. Snow Print Wax
A red color aerosol that not only highlights material but also acts as an insulator and resists melting of underneath spray. They can produce a crisp detailing and are widely used products for highlighting shoe marks detailing before photographing.
Plus, it prevents the additional melt of snow by an exothermic reaction produced by a dental stone while casting an impression. Several layers of snow print wax also add structural stability to casting. You can inquire about the Snow Print wax from here.
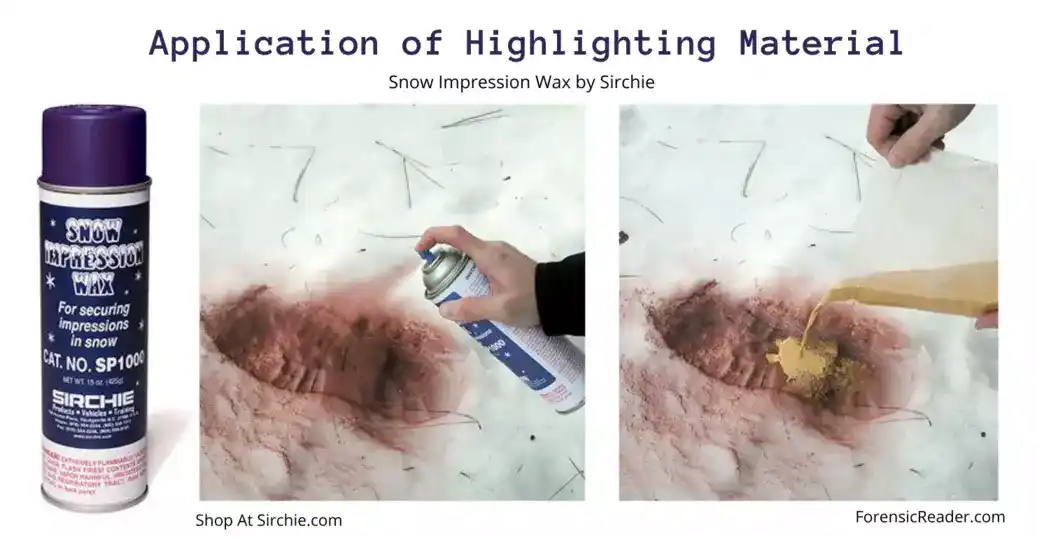
2. Snow Impression Wax by Sirchie
The deep brown-red contrasting color of Snow Impression Wax by Sirchie comes in a 15oz aerosol can. Like other highlighting materials, they also have properties to insulate the snow and avoid melting meanwhile providing obscure details.
However, because of the dull brown shade, the details are not that appealing to Snow Print Wax in non-ambient conditions like evening and night. Know more about Snow Impression Wax.
3. Krylon Indoor/Outdoor Paint Gray Primer
Krylon is not specifically designed for forensic purposes, but it is the most affordable and widely available highlighting material.
Because they were not designed specifically for highlighting impressions on snow, their performance on snow is questionable, especially on soft snow and at cold temperatures.
I would recommend using Snow Print or Snow Impression wax if the shoe print (or any other impression) is on soft and feathery snow. However, in the case of dry snow, you can use Krylon Gray primer. Avoid using them below 20°F (-6.6°C). Inquiry form here.
4. Snow Print Powder
A red powder that specifically works for enhancing features on wet melting or cold frozen snow. As they are in powder form, their application procedure is different. So, how do I use Snow Print Powder?
Snow Print powder, rather than using aerosol, is washed over the impression, such as shoe marks, with a fiberglass fingerprint brush. You should avoid using it on fresh and soft snow instead use Snow Print wax aerosols.
You can have one pack of Snow Print powder from here.
How To Use Highlighting Materials on Snow Impressions?
Most of the highlighting materials come in spray cans and the following are the procedure to use them for overshoe prints and tire marks:
- Photograph: Take initial photographs before using aerosol with a scale. Scale should be placed in the same plane (bottom) to the impression. Know more: How scales are used while photographing?
- Type of Snow: Take extreme care when highlighting impressions on soft powdery snow.
- Highlighting Materials: Never use colored pained aerosols that chemically melt snow. Also avoid darker colored paint aerosols in sunlight, as they tend to absorb more energy.
- Direction: Always spray the highlighting materials in the opposite direction to the ambient light. This ensures better contrast.
- Distance: Avoid applying the first coat of contrasting material with an aerosol from a distance of less than 1.5 feet.
- Angle: Sprays should be applied at a low angle, normally less than 45°.
- Spraying Layers: The amount of spray required is determined by the type of snow. In most cases, 2-3 layers of spray are sufficient.
- Final Photograph: Retake photographs with oblique light immediately after the application of highlighting materials.
- Casting: Because highlighting materials absorb ambient light and make the impression more prone to melting, the cast should be made immediately after photographing. Know more: How to cast shoe impressions on snow?
How to Photograph Shoeprint and Other Impressions on Snow?
Photographing impressions in the snow is similar to photographing any three-dimensional impression, but there are a few extra steps:
Step 1: Camera Alignment and Angle
- Using a tripod stand, the camera should be placed parallel to the plane impression.
- Scale (ABFO Scale No.2) should be used with a label tag.
- Scales should be adjusted in the same place as the snow print by digging a small trench next to the snow print.
- Focus is maintained over design elements and scale on the bottom of the impression.
Related Articles:
- Why Should Photographs Be Taken at 90° to the Evidence?
- Why Is It Important to Place Scales and Evidence in the Same Plane?
Step 2: Initial Photography
Before using highlighting materials, initial photography should be done to define the prior condition of the snow print. An examiner should take:
- Wide area photography of the impression with identification tags and scale.
- Close-up photography of impression with scale.
- Photography should be taken with oblique lighting.
- Take photographs of impressions from at least 3 different positions.
Step 3: Use of Highlighting Material
Spray liquid aerosols from 1.5 m away and in the opposite direction of the ambient light. This results in more contrast.
In the case of Snow Print powder, use a fingerprint brush to lightly spread the powder over the snow impression. Also, avoid using it on soft and feathery snow prints.
Note: Remove scale while spraying or dusting snow prints with highlighting materials. This makes an unnecessary cleaning mess.
Step 4: Re-Photography
Replace the scale over the tench plane area and repeat the steps from step two. Take a series of wide-angle and close-up photographs with oblique lighting to capture more detail.
Re-taking photographs should not be taken long as highlighting impression materials tends to absorb light and increase the melting process.
Step 5: Cast Preparation
Most snow cast preparations take more than 10 minutes, that’s why the cast should be prepared side-by-side before applying contrasting material. This enables a less time window for melting snow after re-taking photographs.
Common Casting materials for snow impressions are Sulfur, yellow sulfur, dental stone, Isomark, etc. Know more: How to cast shoe impressions on snow?
Step 6: Final Photography
The wrapup photography should include the casted material over the surface and along with prepared casted prints. In each step, take close-up photography of each element of the surface after removing the cast.
Final photography should include:
- Impression cast with identifiers.
- Packed containers should be labeled with the investigator’s initials, casting time, and date.
Precautions For Photographing Snow Print Impression
Care is required to avoid disturbance of the impression in this process.
1. Lightning:
- Photograph in oblique light to capture more details due to shadows.
- Avoid direct sunlight or flash to avoid a washed-out image.
- Use dark sheets as a barrier to control direct sunlight.
2. Snow Surface: Snow prints should be prevented by melting by:
- Shading impression from bright ambient light with covering with inverted box.
- Avoid using darker highlighting material in bright light as it absorbs energy and profuse melting.
- Don’t surround the impression as human heat can also increase melting. Allow the cold air to circulate.
- Cover the impression in case of snowfall with a t-shaped tent.
3. Highlighting Materials:
- Avoid snow melting chemical
- Avoid paint sprays
- Avoid powder highlighting material on soft fragile snow
Read More:
- How To Cast Footprints on Snow? Forensic Impression Materials
- 7 Importance of Casting In Forensic Crime Investigation [Explained]
- Forensic Casting Materials: How to Choose One For Different Surfaces?

FR Author Group at ForensicReader is a team of Forensic experts and scholars having B.Sc, M.Sc, or Doctorate( Ph.D.) degrees in Forensic Science. We published on topics on fingerprints, questioned documents, forensic medicine, toxicology, physical evidence, and related case studies. Know More.