Forensic photography is a technique for documenting evidence. Yet, photography alone is insufficient. Plus, only the right photo helps in solving crime.
So what is the right photo for a forensic investigation? Evidence photographed with scales. And the really next question arises, How to photograph evidence with scales? And this is all about what you will discover after reading it.
Why Is Photographing Evidence with Scale a Good Practice?
Main Reason: To document the actual size of the evidence. In general practice, it is advisable to take evidence photographs with and without measuring scales and identifiers.
Other complementary reasons: to maintain proof of identity and future references.
Second Reason: Proof of Identity
Let’s assume a blade of 15.0cm with a fingerprint was found and photographed with scale. During its transmission to a laboratory, it was replaced with a close replica.
It comes to be 15.3cm when measured in a laboratory. It means that the evidence has been replaced by a slightly lengthier replica. And if No-Scale is used during photography, it can’t be traced.
Note: A slight variation could be due to image processing including resizing and magnification, or wrongly aligned scale to the surface, and so on… I will tell you later in the post.
Third Reason: Photograph Never Die Unless Destroyed
Once the evidence arrives at the laboratory, it is physically measured. After that, it sits in the evidence locker for infinite years. But their photograph with scales is always employed as a reference such as cs reconstruction.
10 Tips for Using Forensic Rulers During Photography
These are the ten tips on how rulers or scales are used in photographing various forensic evidence.
- Every evidence should be photographed with and without measuring scales and evidence identifiers.
- Photograph all sides of the evidence.
- Some photographs should capture the entire evidence at once, while others should be close-ups for greater detail.
- Camera lens must be aligned perpendicular to the evidence, not the background surface. You may even use a tripod to align the camera.
- The length of the scales should be greater than the length of the evidence.
- Sketches should be made on-site or during reconstruction using photographs. Use only selected measurement units describing the middle, near corner, far corner, etc. in sketches.
- For bloodstain, use only metric scales (eg. millimeters/centimeters). Try to capture the blood pattern satellites around the main drops.
- In the case of photographing VIN numbers on vehicles, try to stick with perpendicular alignment to the camera as much as possible.
- While photographing serial numbers on firearms, the ruler and weapon should be in the same plane followed by photographing at 90° to the evidence.
- Document the presence of weapons as well as their distance from the victim; be sure to include a scale so it is possible to show the distance.
Read More: Different Types of Scales and Rulers Used in Forensic Science.
How to Choose a Correct Camera Lens for Forensic?
Choosing a camera is fairly based on the state of the crime scene. In general, every crime scene necessitates full-frame, normal, close-up, and wide-angle photos.
For this, a high-quality DSLR camera with 35mm or medium format is useful to take a detailed photograph of evidence. And following are the lens profiles to be used accordingly.
- Normal Lens (50mm): Provides the best overall scene coverage and the most accurate depiction of a live image to the human eye with no distortion.
- Wide Angle Lens (17-35mm): For capturing a short or restricted region, such as confined quarters or small rooms. Also, good for capturing the overall view of a wider area but lacking in detail.
- Telephoto Lens (70-200mm): Used for capturing distant photographs with a close-up look (zooming).
- Macro or Close—Up Lens (1:1): For a photographing minute and specific details of evidence, such as serial numbers.
Forensic Photomacrogpraphy vs Photomicrography
Photomacrography in forensic: The term ‘photomacrography” means taking magnified photographs of small forensic evidence using macro lenses. While ‘Photomicrogprahy’ means taking magnified photographs of evidence that are subjected through a microscope’s ocular with a digital camera.
| Forensic Photomacrogpraphy | Forensic Photomicrography |
|---|---|
| Requires camera and macro lens | Requires camera and microscope |
| Suitable for photographing smaller objects and impressions | Suitable for photography of cellular-level details and surface structure |
| Evidence used such as serial number, fingerprints, palm prints, tool marks, | Evidence documents are the structure of cells, high-magnified images of pollen surfaces, etc. |
Using Proper Lighting Conditions: When using an external flash or on-camera flash in darker regions, use a photomacrography scale with 18% grey color-correcting stripes.
How to Use ABFO No. 2 Scale in Forensics?
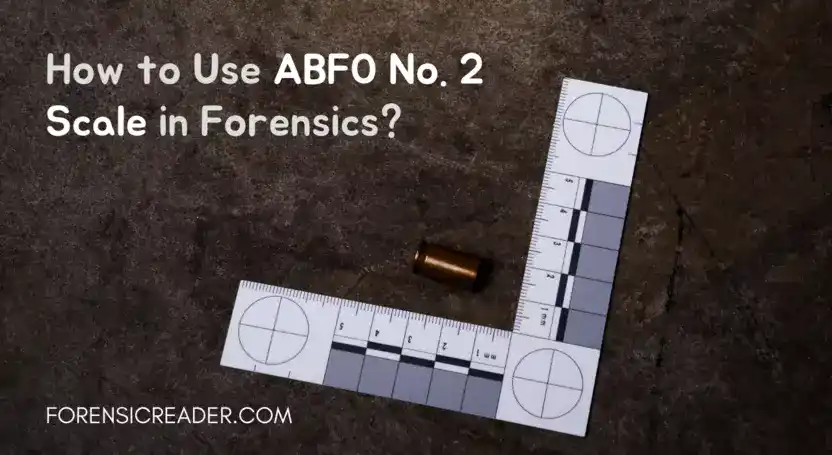
ABFO or an “L” shaped forensic scale is majorly used for documentation and photographing the wounding characteristics.
Documentation usually involves measuring and photographing the exact appearance of the wound. Measuring evaluates the wound dimension. And their appearances can help in determining the healing of wounds— if the person is alive. This will help in estimating the time of injury.
How to Photograph Bitemarks Using ABFO Scales?
Following the tips for using the ABFO No. 2 Scale in case of bite marks and wounds on the body:
- Scale should be placed close to the impression on the same plane as the injury or bite mark.
- Camera should be held or mounted on a tripod, perpendicular to the impression ensuring marks and scales are in the same plane.
- Photograph the entry and exit wound (if any) using the ABFO scale.
- In case of large incised wounds, you can use a Hinged L reference scale.
- Close-up photographs of non-obvious characteristics on the body and clothes should also be captured.
- Take multiple close-up photographs with the scale from several angles.
- Medium-range photography for showing their location on the body.
- Do not use a wide-angle lens, as it will distort the scale of the bite mark.
- It is recommended to take close-up photographs of both sides of the body’s hands, whether they have injuries or not.
Read More: Different Types of Forensic Scales and Rulers Used in Forensic Science.
Tips for Using Scale With Different Evidence
Shoe Marks: For documentation of shoemarks 3d impressions on mud or snow, you should first dig a small trench to make the space on which the scale would rest. This ensures the same plane photography. And photographs should be taken at maximum camera resolution for better detailing.
Tire Tracks: Use a long scale and place parallel to the length of the impression. Take medium-range photography documenting at least 6ft in a 2ft section (2+2+2). Here each section is marked with a consecutive identifier. Repeat the step for each of the tire mark tracks.
Documenting Fingerprints: They are small and hence require a higher resolution camera. However, as most of the prints are latent they are first developed using developing techniques and then lifted and preserved.
Blood Spatter: In a large spatter area, it is first divided into smaller sectors approx 2fts. Like the tire mark section, each sector has its own identifier. Each section should be photographed close-up with overlapping ends. This will make the reconstruction of the scene easy. And using a wide-angle lens, the overall spatter should be photographed with identifiers.
Quick Note: Autofocus should be used when taking photos. If you have trouble focusing the camera on a glass surface, simply place your hand in front of the glass surface, and the camera will readjust the focus.
Why Is It Important to Place Scales and Evidence on the Same Plane?
Evidence and scale must be on the same plane while measuring evidence and capturing photographs. This is done to capture the exact length of the object and remove any ambiguity.
Let me explain this with an example.
You’re at home and measure the length of your front door by putting the scaled longitudinal to the door surface; it’s 12 feet. Let’s step back 25 feet and now lean down the measuring stripe.
How long is it? Yah! It can even fit in your pinky finger (when held at a normal distance from your eye).
Scientifically, as an object gets farther away from your eye, the visual angle (angle formed at the eye by rays from the extremities of an object viewed) decreases, making the object appear smaller.
So, if you somehow reach the moon— possibilities are odd— you can even hold the whole earth in a quarter-dollar coin. That’s ridiculous science! But this explains why placing scales in the same plane as the evidence is important.
Why Should Photographs Be Taken at 90° to the Evidence?
In a single line: Photographs should be taken perpendicular to evidence to make image magnification uniform during rotating, resizing, or distortion corrections. Plus, scaling should be done without altering the number of pixels.
This ensures 1:1 reproduction or life-size images. Another important factor in scaling images to life-size is linearity. Every piece of evidence should have a linear scale.
It is also recommended to include both horizontal and vertical linear scales with evidence. This ensures scaling and resizing. easier and more accurate in both dimensions. The most favorable scale for both horizontal and vertical liner scaling is L-shaped or called the ABFO scale.
How to Photograph Evidence at the Same Level Surface?
To ensure the impression and scale are at the same level, you can use objects of the same height to get the scale even aligned with the impression level.
Using the ABFO scale, you can place the y-axis of the scale beside the injury and the x-axis to the impression.
However, you can also improvise to place the scale to evidence height. You can use Lego blocks, and jars level available at many online vendors.
And all be sure the injury is perpendicular to the camera lens; this will ensure magnifying and cropping the image to life-size to compare it with real human month references.
Continue Reading:
- Forensic Watermark Examination of Paper: Destructive And Non-Destructive Analysis
- 14 Myths of Fingerprints And Questioned Documents: A Forensic Study
- Why is it Not Advisable to Lift Fingerprints from Paper?
- Legal Obligation of Person’s Fingerprints Over Questioned Documents
FR Author Group at ForensicReader is a team of Forensic experts and scholars having B.Sc, M.Sc, or Doctorate( Ph.D.) degrees in Forensic Science. We published on topics on fingerprints, questioned documents, forensic medicine, toxicology, physical evidence, and related case studies. Know More.